Monday, November 28, 2011

Smelly and Non-Photogenic


Brussels sprouts are a thing I have only enjoyed for the past few years. They are undeniably stinky. They are also bitter, and taste a bit like dirt, and have a strangely squishy yet fibrous texture when they're cooked. They are not something you should ever try to feed to children, because they will resent you for decades. Trust me, there is no amount of nutritional advantage which is conferred by brussels sprouts alone that will justify trying to make kids eat them. Just feed them something less yucky.

Brussels sprouts are way beyond Food for Newbies, and this recipe is not for the faint of heart. It's quite pungent. Bonus round: I ate it with beets. Back in September, I ate some beets at a fancy restaurant. I would never have thought of putting sesame oil on beets, but it was pretty darn special. They made it look really cool by using 2 colors of beets, and putting a chimichurri-type condiment on the plate, and some other stuff, but the really important things were the sesame oil and the ginger  vinaigrette. There might have been jicama matchsticks in there too, I can't remember.


I think this really is gratin, because it has a cream sauce, and cheese, and garlic, and a crumb top.


Brussels Sprouts Gratin

1 lb steamed brussels sprouts, sliced thin
1 onion
1clove garlic
a little butter for frying
a pinch of salt

leftover cheese, several kinds- I used about 2 ounces of a very smelly blue, about an ounce of medium cheddar, and one lonely slice of smoked gouda
1 T butter
1 cup milk
1T flour
a shake of black pepper

1 slice of rather stale bread
1/2 teaspoon minced fresh rosemary
1 teaspoon butter
a little grated parmesan (I used the kind in a can)

Pre- heat the oven to 375.

Use an oven proof skillet. Slice the onions thinly, mince up the garlic, and saute them in butter and a pinch of salt until they are quite tender and transparent. Add the sprouts and continue to cook until heated through. Set them aside.
To make the sauce, grate or finely slice the cheese. In a small sauce pan on medium-low heat, mix the butter & flour. Fry the flour for about 2 or 3 minutes, then remove from the heat. When it has stopped sizzling, add the milk and stir thoroughly before putting it back on the burner. Keep stirring. When the milk is starting to steam, and is just beginning to thicken up, add the cheese. Stir until the cheese is all melted, and the sauce is thick. Pour over the sprouts.
Smash or grind up the stale bread and fry the crumbs briefly with the butter & rosemary. Top the sprouts with the crumbs and parmesan, and bake uncovered for 40 minutes.

Brussels Sprouts tips:

1. You could use raw sprouts in this recipe. Clean and slice them, and add them to the onions. It will take a little longer to saute them, but it will be fine. I started with steamed ones because I bought a whole giant spear at TJ's and cooked them all at once so that I could eat them for the rest of the week without too much fuss.
2. The kind of cheese in the mix is not too important, I was just using up leftovers. I will say that the stinky blue cheese is pretty excellent in this. It was too strong to eat by itself, but it was good for cooking.
3. It is probably important to take the roux off the heat before adding milk. I think it prevents you from overheating the sauce too fast and causing it to break.
4. Roux!?!? Er, I mean, the flour fried in butter.
5. I don't usually have fresh milk in the house, because I don't drink it. I used powdered milk reconstituted according to the package instructions. Nobody will ever know.
6. This recipe would be good for company, at least, a company of adventurous eating adults. It is very rich, and is nice in cold crappy weather when you just want to hang out, watch movies, and have a drink and a nosh. 


Sesame Beets

4 or 5 medium size beets
2 or 3, 1/8"-thick slices of fresh ginger, cut into little matchsticks
about 4 T rice vinegar
about 1 T palm sugar, or brown sugar. I'm still trying to use up my palm sugar.
1/4 teaspoon salt
sesame oil to taste

Peel the beets, and cook as you ordinarily would.* I tend to slice them up first and then microwave them. When the beets are tender, put the ginger bits in a sauce pan with 2 tablespoons of vinegar, the sugar, and the salt. Simmer them until the vinegar has reduced by about half, and has formed a syrup. Add the remaining vinegar and pour over the beets. Toss with sesame oil.

You could get a little fancy by saving the ginger slivers to sprinkle on top of the beets after you toss them in the vinaigrette, and maybe adding a bit of chopped cilantro. Obviously, I just wanted to eat my lunch already.


* General digression on beets: Beets are another thing you should only feed to children under select circumstances. Use caution, and accept rejection easily. However, if you're going to cook them anyway, there are lots of ways to do it. You can boil them, but I prefer not to, because then you just dump out the boiling water along with half the beet flavor. You can steam them, with very similar results, and more equipment. You can roast them with their peels on in a 350 degree oven, which really makes them taste the best but takes forever, and then you have to put them in tupperware, let them steam loose from their skins for about 10 minutes, then peel them. It's easiest, in my opinion, to skin them with a yankee peeler, slice them thinly, and microwave them for 3-5 minutes at a time until they're tender. Add a couple tablespoons of water to create steam, and stir them frequently. You need a container that has a good lid, and be aware that it may spit beet juice all over your microwave if you let it get too much water in it.

Saturday, November 19, 2011

Tea Party Cookies!


In the dim and murky past, I used to go to church. I can only say that without doubt, the coffee hour in the basement fellowship hall was the best part. Around the holidays, there was a charity bazaar, where I acquired a sterling silver necklace, ( it looked fabulous with my oversized turquoise sweater ), a wooden rhinocerous, and probably other things I've forgotten. There was always punch for kids, and sometimes there were cookies. I think the presence of cookies may have been related to events in the ecumenical calendar, but I wasn't paying attention. Cookies! That was the important part.

There were 2 kinds of cookies that I liked best. One was lemon bars, naturally, and the other was any type of thumbprint cookie. Some were fancier than others. They looked like they had been extruded from a pastry bag, with little ridges in the swirls, or they were like layer cookies with a hole cut in them so you could see the jam. (I now know that cookies like that are linzer cookies, but they looked similar to me.) I think most of those thumbprint cookies had to have been store bought, because they usually had that wonderfully tropical tasting palm oil flavor.

Part of my enjoyment of this type of cookie is aesthetics. They look delicious. And they're cute. They're dainty looking. And of course, I could eat about, oh, a zillion of them. I have always loved the combination of shortbready cookie base with a chewy fruit blob in the middle. Raspberry is probably my favorite, if I must choose, because I really like pink flavors of food, but then again, the yellow flavor is good too.

Thumbprint Cookies

1 cup butter
1cup powdered sugar
2 cups all purpose flour
1/2 teaspoon vanilla
1/4 teaspoon salt
jam

Cut the butter, sugar, salt & vanilla together until they are pretty well mixed, then cut in the flour until the dough is evenly smooth and holds together easily. It will be very stiff and pasty. Pull or scoop off 1" balls of dough, flatten them slightly, and poke a dimple into the top of each one. Start pre-heating the oven to 350. Freeze the cookies for at least 20 minutes, then arrange them on a baking sheet sheet about 2" apart. Drop about 1/4 teaspoon of jam into each dimple, and bake the cookies for about 15 minutes. They should be just barely turning brown at the edges.

Useful points:

1. Use a pastry cutter. If you use a mixer, you may fluff too much air into your dough. That would be ok, but be aware that the cookies will first poof up, then collapse in the oven, making them rather flat.
2. That's 130 grams of powdered sugar, to be exact.
3. It's important to freeze the cookies before baking them. They will hold their shape much better.
4. I used a melon baller to scoop evenly sized bits of dough, because an ice cream scoop is way too big.
5. You can use your finger to put the dimples in the cookies (duh...) but I found that the back of my 1/4 teaspoon measure creates a nice, symmetrical dent, which I already know will hold exactly 1/4 teaspoon of jam.
6. Don't forget to eat one or two the minute they come out of the oven, because they will be quite crunchy when they cool down. It would be a pity not to know what they are like while they are warm and squishy.

Obviously, these cookies are related to hamantaschen, but they are a lot less fiddly. I do like the cream cheese dough for hamantaschen, but overall, the simplicity of this recipe wins out for me. On the other hand, at the risk of sounding very unlike myself, I think this recipe may have too much butter. More precisely, I think there is proportionately too much butter for the rest of the ingredients. A lot of the fat in these just oozes right out during cooking, which annoys me. It may need just a smidge more flour, which I should have weighed before mixing these up, but oh well. Next time. There will be several next times too, because that peculiar jam I got is just perfect for making these, which makes me feel much better about having bought it.


Thursday, November 17, 2011

I just remembered something


I bought this jam because I thought that I was stuck in a rut with the jam I always buy. Experiment, you know. I thought it was a good idea to try something new. I'm not tired of the old jam, but the world is full of jam to try and if I keep getting the same kind, I'll never know what the other ones are like. So I bought this, because it's not like the usual berry-what-what I already know I like. Plus, the color is attractive.

And then it made me feel very...uncomfortable. There was something odd about the jam. It tastes alright, I suppose, for sure it isn't yucky. Third party confirmation says it's actually pretty good. There was just something about it that made me feel uneasy. Not texture either, if you're wondering, that part's fine. The jam was reminding me of something I couldn't put my finger on.

This morning I remembered. Dad used to make jam from the leftovers of his fruit cordial experiments. He would take vast quantities of fruit and boil them down into syrup, ferment it slightly, then punch it up with vodka. There was always a pile of amorphous brownish fruit precipitate left over, and being a crazy chinaman, Dad could never bring himself to simply throw it away. He would add a bunch of sugar, cook it down into a paste, and put it in cans. There were a number of these still in the basement until the late 90's, I think. Because of the treatment it had received, the fruit lost any individuating characteristic it may once have had. No matter what it started out as, it all ended up as a sepia colored paste, with a flavor profile consisting largely of table sugar and a whiff of inadvertent caramelization. Only once to my memory did he make something that retained a unique quality, and that was when he used pineapple. My Freddies jam experiment tastes like what Dad might have come up with if he knew, or cared, what he was doing.

Dad was a tremendous cook, but only when he stuck to what he grew up with, so to speak. He had neither the palate to comprehend western cooking, nor the ability to admit it. Preserves of any kind as Americans understand them were totally beyond his scope, along with any type of pastry that was not deep-fried, European style bread, cheeses of all kinds, and any number of vegetables native to the western hemisphere. Squash? Hah. Corn? Forget it. Chick peas? That's "food for pigs". One time he tried to make a lemon cake. It tasted like burnt rubber and had a textural resemblance to a spare truck tire. The only cake he ever managed to learn how to make was a kirsch torte, and that was because he learned the recipe by rote from a neighbor lady, and never deviated from it. Which is remarkable in itself, now that I think about it. I have to admit that my tendency to improvise recipes is undoubtedly derived from his.

Tuesday, November 8, 2011

More things to do with dough


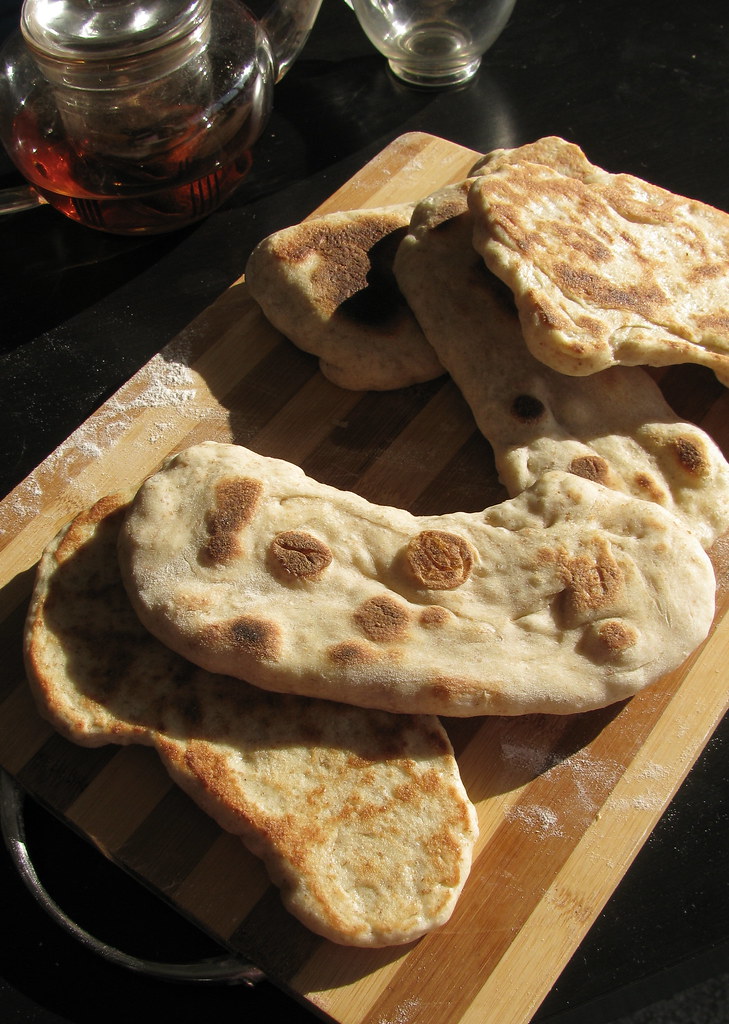
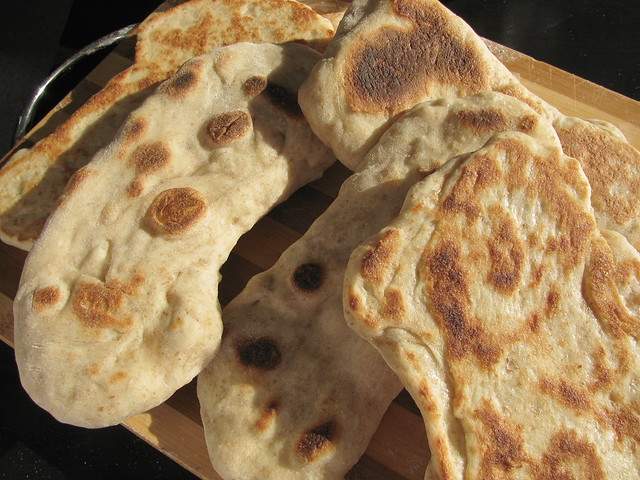
A very long time ago, I posted a recipe for spinach lentil curry. It's one of my staples in cooler weather, but I wanted something a little different to go with it. I also love naan, but buying anything made out of bread these days seems like an extraordinary expense. These aren't authentic naan, but they're pretty good.

Naan procedure:

Use the pizza dough recipe from the last post, but swap in about 25% whole wheat flour.

Knead and rest the dough the same way, and when you're ready to use it, pull it out of the fridge and deflate it. Put a little oil on your hands to keep the dough from sticking to you, and tear off pieces of dough about twice the size of a ping pong ball. Stretch them out until they are about the size of your palm, then set them aside to rest for bit.

Meanwhile, heat a heavy skillet to medium low. I use a cast iron pan. You don't need to oil the pan, but you do need a lid for it.

Once the pan is hot, put a bit more oil on the dough bits and pat them out until they are about 1/4" thick, then lay them in the pan. My skillet is just about big enough to cook 2 at a time. Cover the pan and let the naan cook for 3 minutes, turn them over, and cook them another 3 minutes. That's it!

As usual, there are some things I think are important to pay attention to.

1. The pizza /baguette dough formula calls for bread flour. This makes it chewy. Adding whole wheat makes it slightly less so, but traditionally naan is made with a lower protein flour. All purpose flour would probably be closer.
2. Also traditional is the use of copious amounts of butter, mostly for frying, but also I think there is some butter or oil in the dough itself. Again, this would tenderize the dough, if you wanted a more traditional end product.
3. Additional ingredients commonly used are nigella or cumin seeds, anise seed, or caraway seed, also fried onions and or potatoes are often mixed in. I didn't have any of those things on hand when I took a notion to make these.
4. The toasty bits are vitally important! If you don't have any little chewy crusty dark bits, it won't taste like naan.


So why did I decide to use this somewhat deviant recipe to make naan? Because of my desire to have a range of versatile, cheap, generic, ingredients that I can dress up a variety of ways. A wad of flour, water & yeast doesn't get much more basic, but already I've used it for French, Italian, and Indian cooking styles. I haven't made any steamed buns with it yet, but that's next on the list.

Saturday, November 5, 2011

mmmm...Melty cheese.


Pizza is a nearly perfect food, in my opinion. It has melted cheese, and it has bread. And tomato sauce. If it hasn't got tomato sauce and cheese, it really isn't pizza. It might be tasty, but pizza needs red sauce and cheese. Mozzarella, not some other kind.

I used to be a fan of TJ's pizza dough. It ain't bad, but making your own is a no-brainer when you think about the fact that buying dough costs $2 and making it costs about...50 cents? Pocket change. That's a buck-fifty to use for cheese, damnit!

Remember the baguettes? The procedure was kinda fiddly. I said the hell with it, threw all the ingredients in the bread machine at once, kneaded, proofed it, then stuck it in the fridge. Half the dough made one 12" pie. I even used a bottle of marinara from the store for sauce, and it was great. I do like traditional pizza sauce, but I need my ingredients to multitask. You can put marinara on pizza no problem, but pizza sauce on spaghetti is a little weird- it's too sweet.

Pizza!

425g bread flour
255g water
11g salt
3g instant yeast

Knead everything together for 10 minutes. If you don't have a bread machine, don't worry. Just work everything into a pretty smooth ball for a few minutes. Let the dough rise for 45 minutes in a warm place (I leave it in the machine), then put it in a tupperware thing big enough to let it double in size overnight. If your lid hasn't got a vent built into it, don't seal it tight, or the expanding gas pressure in the dough will pop it off eventually.

When you're ready to make pizza, pre-heat the oven to 550, or as hot as it will go before it's on broil. Tear off half the dough and lightly poke the air out of it, but don't knead it, or it won't stretch out when you want it to. Cover it and set it aside while you assemble your ingredients and wait for the oven to heat up.

Once the oven is hot, stretch the dough into a circle and top it with your choice of decorations. Sauce, cheese, other stuff, then another light layer of cheese to anchor things down. It only takes about 10 minutes to brown a pizza at that temperature.

Tips!

1. Do use bread flour. All purpose flour won't give you the chewy texture a good pizza has.
2. Also, letting it sit over night is important. This recipe skips the dinking around with pre-fermentation and stuff, so the sitting in the fridge is essential to develop flavor.
3. Why in the fridge? Wouldn't it be better to let it sit on the counter where it's warmer? Well, no, because at room temperature for that long, the yeasts would start turning the starches into alcohol, and the dough would be over-fermented. The low temperature in the fridge keeps things under control.
4. Too much sauce will make the cheese slide off in a painful lava flow onto your lip and chin.
5. Remember, if you use any fresh greens, they will shrink into almost nothing as they cook.
6. If you use any hard vegetables or any meats, be sure to grill them or something before topping the pizza with them. At the speed at which the pizza cooks, raw squash, for instance, will not be done by the time the dough is crispy and the cheese is a little brown.
7. I don't have a pizza stone, but I do have one of those perforated metal pans. If you have neither, just don't use one of those insulated double-walled cookie sheets. The idea is to have the bottom of the pie get as crispy as the edges, or it won't have enough oomph to pick up a slice when it's done. Use a thin metal pan, or even just a sheet of tinfoil. Whatever you use, oil the dough slightly to prevent sticking.


This is actually the 2nd pizza I made with this batch of dough, and if anything, the dough is better after sitting in the fridge for 4 days. The first one, on Wednesday night, was a pretty standard mushroom & cheese version, which was good, but this one has roasted squash and italian sausage with arugula. Very nice for fall. I was reading the food section of the paper, and they had a special on squash or pumpkin, and there was a suggestion for pumpkin with pesto on pizza which I thought sounded nice. I was also thinking of the sausage & cornbread stuffing Pete makes and serves with squash. No cornbread here, but you get the idea.

Thursday, November 3, 2011

What Nerds Worry About

My brother's daughter wanted to be Ahsoka Tano for Halloween. She asked for help, of course I said yes, I had no idea what I was getting into. A week later I ask her about it again, and she shows me this lego mini figure. I think, oh, shit. It has a blue and white head and 3 tentacles, and horn-things to boot.

So I decide that I need some pictures to work from. The search results are pretty predictable. Lotsa pictures from the Clone Wars animated series, lots of fan art. LOTS of internet rule #34 fan art. It isn't that naked lady pictures bother me, I enjoy them, as a matter of fact. I had a discussion with somebody about naked lady pictures a while ago, and the fact that even straight girls like to look at naked lady pictures. Why wouldn't we? Women are inherently better looking than men. Face it guys, the truth is that in the birthday suits department, most of you are just kinda meh. We, on the other hand, are usually worth at least a second look. Plus, dudes without their clothes on are just silly. Women are beautiful. Anecdotal proof? Number of pages before you find a rule 34 pic of Ahsoka: one. Number of pages you have to scroll through before you find a picture of Obi-Wan with his pootiepows flapping in the interstellar breeze? Well, I didn't find any. Not sure I want to. Even if it is Ewan MacGregor.

However, there is something going on here that troubles me. Partly it is the fact that, as I understand it, the character as written is an adolescent. There's something creepy about having a teen (pre-teen?) character depicted in / fan art with Obi-Wan, who has gotta be at least in his late thirties in this cartoon series. And partly because it was so dang hard to find this one image:

Art by This guy
I do realize that the internet is the home of the lowest common denominator, but is it really that hard to imagine a character that is written as a badass growing up to be still a badass? Without having to show ginormous gazongas? Whatinhell do gazongas have to do with badassery anyway? I do love me some gazongas, but the equation of Badass + Female = Gazongas doesn't add up to me. These things are not related.

Now, there are plenty of pictures of Ahsoka kicking ass, and plenty of her depicted as an adult, but they've all got her wearing this silly bandeau top and a mini skirt. Some of them have her wearing rather less. Which admittedly would be more practical for waving a lightsaber around in than a monk suit, but hell, Obi-Wan doesn't wear a speedo and a wife beater does he? Nooooo, he's a jedi, and jedi knights wear a monk suit. This is the only picture I could find where Ahsoka is depicted as an adult, as a jedi knight, wearing jedi robes. And that's not all, because to my eyes, this is clearly a picture of a beautiful woman who is totally ready to kick your ass if you're one of the bad guys.

By this point, I've managed to get a bit heated under the collar of my monk suit over my niece's Halloween costume. And, because Sophia has still got a few years to go before she's 10 years old yet, I'm telling you all about it, because my niece deserves to have a whale of a time being her own badass kid jedi self as long as the world lets her. When Sophia (Or Tesla, or Daille, Dorothy, Agatha, Hyacinth, or tiny little Beatrice) grows up, and asks me for a ridiculous tube top or a metal bikini for Halloween, I will probably make her one. But I swear I will weep with pride if any one of them comes to me and says 'Aunt Buzz, I need a real, badass jedi robe. And maybe some body armor. Can you help me out with that?'

Friday, October 28, 2011

Better than it sounds


I can't even remember why I tried this in the first place. Was I thinking of nicoise salad? Craving protein? Down to the last things in the fridge? Beats the hell outta me. Usually I'm not too excited about sandwiches in cold weather, at least, not ones that do not feature melted cheese, but this is an exception.

1 can of tuna in olive oil
1 smallish carrot
6 or 7 olives
1 teaspoon fermented black bean sauce

Drain most of the oil out of the tuna, chop the olives, shred the carrot, and mix everything together. You know, just make tuna salad with it. It's not fancy or anything.

 On the other hand, I do think it's special. The oil-packed fish is the big thing, of course. I've made this with TJ's brand fish, which is pretty darned good, and I've done it with this fancy(ish) brand I got at Fred Meyer that has a gold label and some Italian stuff written on it which costs a dollar more per can and is good enough to eat plain with a fork. TJ's is plenty good enough for this, but I sure did enjoy the 'italian tonno'. In either case, tuna in oil has got more tuna flavor without being offensively fishy. The texture is better too. Tuna in water can have a slightly fiberous mouthfeel, which needs to be amelioreated by heavy doses of mayonaise. Mayo also helps with the typical blah-ness of ordinary canned tuna.  But if you're going to do that, why not just have fish that tastes like fish? It'll have the same fat content, or less, than all that mayo, and less cholesterol, if you're worried about things like that. I loves me some mayonaise, but it is a condiment, not a primary food item.

Olives and black bean sauce is not an intuitive combination, but it should be. They are both fermented and brined. You would think that one or the other would be good enough, but no, both is actually better. I'm afraid I have no geeky theories about what is in each ingredient that makes the two together better than either alone; you'll have to take my word for it. Use good olives. I start with rather boring kalamatas and punch up the brine with a little more salt, vinegar and some herbs, usually rosemary and a bay leaf.

The carrot is not insignificant either. There is a lot of salt in the rest of the ingredients, the sweetness from the carrot really balances things out. It also adds crunch, which is very important. No matter how good your tuna is, it's still canned tuna and needs a veggie to go with, even beyond lettuce. I think that must be the main purpose of celery in traditional tuna salad recipes.

No cheap bread! Disappointing bread will be the downfall of any sandwich, be the innards never no good!

Sunday, October 23, 2011

Pole-ish


I missed the Polish festival, didn't I? Dang. Those ladies know how to make some serious grub. Plus, there are people running around in costumes at events like that, and I'm always in favor of playing dress-up.

But I missed the cabbage rolls! Drat and drat. Cabbage rolls are a thing I have loved for many years. Dad used to make them filled with beef and rice. I think he topped them with a lot of ketchup, which may have influenced my liking for them; be that as it may, I start hankering for them in the fall. There is no way I'm going to fiddle around with scalded cabbage leaves and so on for hours on end, so I came up with this stew instead. It has the earthy/savory/sweet/sour flavor combination of a really good cabbage roll, without all the fussing. Plus, it isn't as greasy as the traditional ground beef or pork things.

2 chicken thighs
a small can of tomato sauce
about 4 cups water
1 teaspoon chicken broth concentrate
1 tablespoon paprika

1/2 teaspoon dry marjoram
a shake of onion powder
2 or 3 allspice berries
3/4 lb cabbage

1 teaspoon fresh lemon juice


Take the first 5 ingredients and put them in a large, heavy, pot, one that has a good lid. Bring them to a slight boil, and then keep it that way, covered, until the chicken shreds easily.This could take a while. Assume at least half an hour, maybe longer, if you use frozen chicken like I do. Stir it from time to time until you can smash the meat with the back of a spoon. About half the water should have cooked out by this time.

Coarsely chop the cabbage and add it along with the allspice, marjoram and onion powder. Simmer until the cabbage is very tender, which could take another half hour. You can turn the heat up a bit, but make sure the pot doesn't go dry.  Add the lemon juice, simmer for a few more minutes, taste for salt, and serve with some fresh thyme leaves on top. I'm going to eat it with potatoes, but you could serve it over rice, which would approximate the ingredients of a cabbage roll.


notes-

1. You could use any can of plain tomato something. Sauce is what I had, but crushed, diced, pureed, any old tomatoes would work. You just have to taste the stew to see if it has the right amount of salt.
2. You can use oregano if you don't have marjoram, but use a little less of it. Marjoram is sweeter, and oregano is more peppery.
3. Don't rush it. The most important ingredient in stew is time. Enough time to break the collagen in the meat down into gelatin, for the texture. Enough time for the cabbage starches to begin to convert to sugars, and for the acids in the tomatoes to mellow out a bit.
4. The reason you want to use whole allspice berries is so that you can fish them back out when you have flavored the stew as much as you like it.
5. Do use thighs. You need a little fat in it to help carry the oil-soluble flavor molecules, as well as to make you feel full after a reasonable portion.

Sunday, October 16, 2011

I am 37


I celebrated by doing nerdly innocuous things all day. Like go to the Portland Nursery to buy apples, and ride my dreadful bike. I went over to my brother's house, which had no electricity, and had family dinner, and we were all glad that a) the self-destruction of his electric meter did not result in anything worse, that b) my brother in law had cooked the turkey at his house, c) that a gas grill makes really good roasted cauliflower and d) cake.

The cake is an improved version of the banana cake I made before.

Banana cake 2

1 package TJ's freeze-dried bananas
1 cup butter
1 1/2 cup sugar
4 eggs
2 1/2 cups flour
2 1/2 teaspoons baking powder
1/4 teaspoon salt
1 cup milk

Pre-heat the oven to 350.
Butter & flour a 9 x 12" pan

Pulverize the bananas in a food processor until they are a very fine powder. Cream the butter, sugar, and banana powder together until the mixture is very smooth and light. Add the eggs and vanilla, and continue to beat until the batter has an even fluffy texture. Sift in the dry ingredients alternating with the milk, mixing gently but thoroughly between each addition. Spread the batter in the pan and tap it gently on the counter so that any big air bubbles pop out. Bake for about 25 min, then allow it to cool before removing from the pan.

The previous post on this subject covered most of the important points, but there are a few things I should point out:

I used the same cream cheese frosting as I did the last time I made cake, although I forgot to mention at the time that the strawberry portion needs an additional 2 or 3 tablespoons of water. The strawberries reconstitute very rapidly, and will make the frosting too thick and sticky to spread without a little more liquid.

This cake did not rise as much as the other one. I think my oven is getting worse. I made this, and the top of the batter did not cook at all well. It still tastes good, but the upper stratum of each cake layer is a smidge under-done. Regardless, I think that the formula I used this time is an improvement over the last one.

I have slightly mixed feelings about this cake. On the plus side, the insides of this version are much more visually appealing, I think. The freeze-dried bananas don't brown the batter the way fresh ones do, and the contrast with the pink icing is better. On the minus side, this still needs either an electric mixer to get more air in the batter, or more leavening. The cake is quite dense, rather than fluffy, but I'm not going to be too picky.  More importantly, it has a subtle but rich banana flavor which is enhanced by the frosting.

Wednesday, October 12, 2011

Migas


Migas is to the latin world what fried rice is to asians: a method of using up leftovers. I read that migas is just the word for crumbs, and while the dish is usually made with tortilla chips or fried stale tortillas, I had a cornbread muffin. I took the word crumbs literally, and rooted around in the fridge for whatever else I could find, and here is lunch.

Fried squash & cornbread migas

some roasted summer squash pieces
a stale cornbread muffin
some chives or scallions, minced
a bit of bell pepper, diced
an egg


Chop the muffin into 1" chunks, and fry them in a little oil or butter along with the squash and pepper bits until they're brown and the muffin is a bit crispy. Sprinkle in the onions or chives and a dash of salt & pepper, then crack an egg over the lot. Poke the egg around a bit so you have a nice mix of egg, bread and veggie bits. Salsa, yogurt & avocado are optional, but the avocado is especially nice.