Friday, February 26, 2010

Chicken Piccata

Maybe there are 2 t's in that? Piccatta? Is it Italian? Who cares. This is lunch in 20 minutes.

3-5 chicken tenders
some butter
some flour
salt and pepper
1 or 2 tablespoons fresh lemon juice
half cup of chicken stock
some capers
parsley

served with papardelle and peas

Dude! This recipe has no cheese! That puts it in the minority of non-asian dishes I find satisfying. No onions or garlic either; that's something.

I prep the chicken tenders a few days in advance because I start with frozen. I salt & pepper the frozen chicken, drizzle on a dab of olive oil and leave it covered in the fridge until I want it.

Start the water for the noodles.

Pull the tough white things out of the tenders if you like. Makes them easier to eat. Heat a skillet to medium-high. Roll the chicken in flour and melt a pat of butter in the pan. Brown the chicken on each side. Tenders will take about 1 minute for each side!

Somewhere in here, the water will boil. Throw in the noodles. I cooked 'em til they were about 3/4 done, then dumped in the peas too. Less clean up.

When the meat is cooked, set it aside, and add the stock, capers and lemon juice to the pan, along with another little pat of butter. Taste it- if it is too sour for you, add a little more stock to thin it, and a tiny pinch of sugar. Bring it to a boil and it should thicken up. Turn the heat off and wait for the noodles if you need to. If you don't, then just before you serve it, chop up the parsley and add it to the sauce. If you're by yourself, I wouldn't blame you if you were to throw the noodles and chicken into the pan and eat from the skillet. I assure you, it is just as tasty that way, but I did want a slightly fancier picture to show you all.

Notes: fresh lemon juice. I keep lemons frozen for practicality, but nuking them to get the juice out also gets a lot of the bitter oils from the rind into the juice. It's ok, but given my druthers... Don't be tempted to put the parsley in too soon. The acid in the lemon juice will start to make it go all brown after about 9 seconds. Really.  When  flouring the chicken, really press it in. You want a good coating; enough to give a bit of crispyness but not enough to resemble breading. The flour that falls off and stays in the pan is what thickens the sauce later. And dagbone, I meant to brown some mushrooms in it! Oh well, next time.

"...I love my chicken...You got to know your chicken..."
 

Tuesday, February 16, 2010

And Happy Mardi Gras!


Cake.

I've had discussions with several people, on totally unrelated occasions about the particular magic of the word 'cake'.  I agree. Cake is a good word. It implies so many wonderful things that when somebody says "Oh, it'll be cake" they mean it'll be too good to be true, possibly better than you deserve, and in any case, there will be lots of fun and goodness to be had.

It also means something is easy, which cake isn't, always, except for the eating part. But with the aid of modern technology, cake is really not that daunting an achievement. And damn, sometimes I do miss celebrating mardi gas.

King Cake

For the dough:

1/2 cup water
15g dry milk
10g instant yeast
about 4 1/2 cups flour- I used all purpose, but I wonder now if I should have used bread flour.
1/2 cup sugar
1/2 tsp punkin pie spice
10g salt- this is about a scant teaspoon
1 tsp vanilla
3 whole eggs
4 egg yolks
1 stick of butter

the filling:
about a cup each of lightly toasted pecans and whole dried dates, 1/2 cup brown sugar and 1/4 cup oatmeal. Chop everything in a food processor. The oatmeal is really just to keep the dates from turning into paste. It should be slightly chunky.

I put the dough ingredients in my bread machine. I had to add quite a bit of flour when it started kneading; I think I measured the flour wrong to begin with... But don't worry! It'll be fine. This dough should be about 25% softer than a dough you make regular bread with. You may think that it will be too sticky to work with, but there is so much butter in the recipe that it really isn't a problem.

I just let the dough machine do its thing, and when it beeped to tell me the first rising was done, (that's about an hour) I floured my counter, turned the dough out onto it, and rolled it out into a rectangle about 15x24 inches. Then I took the filling and pressed it firmly into the dough, right up to the very edges. It's ok if some falls out the sides, but you probably don't want any unadorned patches in your cake. You can eat the bits that fell out while you wait for the thing to rise.

Roll the dough up along the long axis of the rectangle. As you roll, flour it a bit so it doesn't stick back down on the counter. The middle of the roll will probably be rather thicker than the ends, so gently stretch the dough out. You need your cake roll to be at least 2 feet long. Have a greased sheet pan ready, as well as a small oven-safe dish, also oiled. Put the little dish on the sheet pan and wrap the cake roll around it. This will keep the ring shape from closing back up. Tuck the ends in and let it rise for about another hour.


The recipe this is based on said to bake it with the little dish in place to keep the ring shape, but upon reflection, I decided to take the thing out before baking. I also slashed it and gave it a bit of an egg wash, which I'm very glad I did because it made it so pretty I was literally taken aback.

Bake at 375. Mine took almost an hour. If you can make yourself refrain from flapping the oven door open the way I do, it will take less time, but you should cover the cake with a sheet of foil once it's nicely browned or it will get burnt. I'm pretty happy with how it tuned out, but I think I overcooked it. Other notes: I read a recipe for boiled frosting, which tastes good, but just slid off the cake. Just do the thing where you mix a couple tablespoons of lemon juice with an enormous quantity of powdered sugar and it'll do better. This dough seems to be a nice all-purpose brioche. I bet it would make a great french toast loaf. And the filling is not traditional. Almond paste may be what is supposed to go in it, but I liked this an awful lot. Fill it, or not, with whatever you like.

Saturday, February 13, 2010

Yappy Hoo Near!

Wikipedia has an entry about Tang-Yuan that seems to pretty much line up with what I remember about them.

Last year I made some of these with mochi flour and a rather poor approximation of mung bean filling. This year, I got a bug in my ear and decided to go from scratch. And I managed to remember that when I was very small and was eating them for probably the first or second time, the ones with plum filling were my favorite. The ingredients are simple, the procedure is not complicated, but it is time consuming and labor-intensive in parts. Do not  attempt the filling recipe unless you are willing to literally stir constantly for about 40 minutes. Your arm will get tired.

Here's what you need:

2 or 3 cups sushi rice, in a large pot big enough to fit that plus about 5 cups of water.
a blender, a large colander and a piece of muslin big enough to line it with.
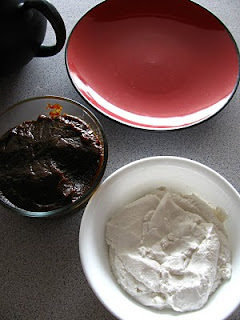
3/4 lb of prunes
2/3 cup cooking oil or shortening. Saturated fats will make the finished produce easier to work with.Lard is traditional, dad used duck fat when he had it.  Chicken, maybe not.
possibly a half cup of sugar, but I didn't this time, I wanted it to be a little tart.

a very heavy 2 qt cooking pot, and NOT a non-stick one.
This recipe will make enough for a whole party of squeamish people, or for a small number of afficionadoes. They are even more weird and ethnic than mochi.

Leave the rice in the water for up to a week, and at least 3 days. Unless you want to risk having it ferment, stow it in the fridge. The rice grains will absorb water to the point where they start to disintegrate. Pinch one in your fingers and you'll see. It'll crush into a coarse mush. Then line your colander with the muslin, and put the rice through the blender, using only as much water as needed to keep it liquid enough for the blender to cope with it. This will take a while. Get it as finely ground as possible, and pour it into the muslin lined colander. Tie up the cloth and let the liquid drain out (this is likely to take at least 24 hours, so put it back in the fridge), and the mass of rice paste is your dough. You should freeze it if you aren't going to use it within a couple days. I found that after draining, freezing and thawing once, it was still coarser than I wanted, so I put a glob of it back in the mini-process and ground it again, with very good results. I suspect that the freezing helps break down the grains.

For the filling, put the prunes in the heavy pan with enough water to cover them, and bring them to a boil. After about 8 or 10 minutes, they should be tender enough to put in the blender, again using as little water as possible. Return the pureed prunes to the pan and add the oil and the sugar if you want it. From now on, be prepared to stir. With the heat at medium, use a wooden spoon to methodically scrape the bottom of the pot. The correct temperature for cooking will make the puree sizzle gently but quickly as you expose the bottom of the pan when stirring. You are going to cook all the water back out of the prunes which you just put in. After about half an hour of stirring, the paste will begin to form a coherent mass, and some of the oil will begin to sweat back out of it. It's done when it is very dark and has a consistency about halfway between Jif and Play-Doh. Turn off the heat and keep stirring until the paste stops sizzling against the pan, then refrigerate it in tupperware until you want to use it.

You know, lots of fruits can be treated this way. Dad used pineapple one year, which was good, and once, there was a batch made out of dried chinese red plums. That didn't go over so well, it was full of tough, splintery fibers. It tasted good, but the texture was decidedly sinister. Very pokey. Good lord, that must have been in like, 1979 or something. Don't feed things like that to your kids, they'll never forget. Anyhoo, the thing is, after all that cooking, anything you use will have a tendency to taste similar. It's the caramelization.

What to do with it:

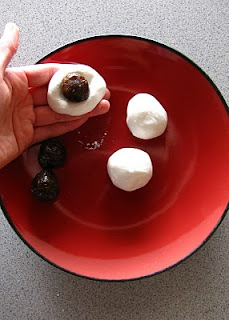
Take the rice dough, pinch off pieces about 2 tablespoon sized, and roll them onto balls. If the dough was drained long enough to make it too dry, just add a little water back into  it. Make little balls out of the filling, about 1 teaspoon sized. Hold one of the dough balls in your palm and poke a hole in it about down to the middle, and push one of the filling bits into the hole. Gently roll the dough in your palms to re-form it into a solid ball with no filling showing. The whole business should end up about the size of a ping-pong ball. Continue until you have as many as you want.


Bring a large pot of water to a boil and drop the tang-yuan into it. Stir them once so they don't stick to the bottom. Wait for the water to boil again. Once the water boils, turn it down to a simmer. When the tang-yuan are done, they will float to the surface. As the rice starches expand, they become more buoyant. The side that is immersed in the hot water will eventually become so much less dense than the top that they will flip themselves over if you poke them gently. Don't cook them any longer than that, the dough will just disintegrate.

Traditionally, these are served in a generous amount of the cooking water. I think that just makes them watery-tasting, so I usually don't do that. However, I have to admit that cooking them from scratch makes the cooking water actually pretty appealing. The freshness of the rice flour is orders of magnitude more delicious than frozen store-bought, and the texture is both firm and tender. You would think something made out of just rice would be boring, but that doesn't have to be so. Rice should taste like rice, and things made out of it should be yummy.


Lastly, I used olive oil in my filling. It's ok, but I don't really recommend it. The oil oxidizes or something in the cooking, and even if you use the most boring kind, the taste becomes more pronounced at the end. Like I said, ok, but definitely not traditional. Use peanut or canola or corn oil if you can't bear to use lard.


Friday, February 12, 2010

It's spring

Yes, yes, it is not even President's Day. But I have proof. Pictures, even.


My strawberry started blooming around the first of the month.


So did my rosemary.


And it looks like my tarragon plant is going to look really respectable. It was pretty undersized last year.


Yup, I got spring fever. Feels nice.

Saturday, February 6, 2010

Girl Food

Tofu is girl food. If you're not a girl, go 'way, I'm not talkin to you.

Ladies, you all know that I am an omnivore, that I love many foods made of other animals. But it's not exclusive, nor is it a prerequisite for my enjoyment. And I'm not talking about the stuff you decorate the edges of your meal with. For me, tofu is sometimes an object in itself.

Here's the thing though: I think have yet to meet a man who didn't feel that to be fed tofu as a main dish was somehow unmanly, and not altogether fair. Even oriental men. Meat is for men, not, as dad said, "that cheating stuff" (Imagine expressive sneer). And yes, even the vegan men I have talked to. Not one of them ever gave me the impression that giving up meat in favor of actual tofu was something they contemplated- no, they would go to great trouble in order to acquire the most suitably manly, highly processed, meat-esque, soy-derivative pseudo-food. Men will subsist upon plain Ramen with earth balance margarine and Jif and Smuckers sandwiches before they will voluntarily make one of these wraps for themselves. Oh, they will eat one if you make it for them. They might even grudgingly admit that they like it. But then they'll say "...but it would be so much better with cheese, or chicken, or Tofurkey smokey mystery nubbins instead ..." Lordy, yes, then there's the sprouts. The only manly things about this recipe are 1- you eat with your hands, and 2- sriracha. Dudes like the sriracha.

These are chewy, crunchy, salty, spicy, earthy, and full of umami goodness.

Marinated Tofu Wraps

1 block firm tofu, cut into 1/2" slices and drained as much as possible
2 teaspoons nutritional yeast
1/8 teaspoon each garlic powder and onion powder
1/2 teaspoon grated fresh ginger
2 T balsamic vinegar, use a rather sweet kind
2 T soy sauce
if you use light soy instead of dark, add a generous pinch of salt
1 teaspoon sesame oil

Lay the tofu in a single layer in a baking pan. Whisk the other ingredients together well, pour over the tofu and refrigerate overnight. The next day, flip the pieces over to get them evenly covered with the sauce and bake them at 325 until the marinade has condensed and is quite thick but not burnt. I recommend letting it cool before eating it, the texture is better. I wrapped mine in homemade tortillas with a generous amount of mixed sprouts, whole grain mustard, avocado and sriracha. You can steam the tortillas for a few minutes to make them softer, if you like.