Showing posts with label cooking tools. Show all posts
Tuesday, December 7, 2010
Noooodles!
They need that many o's because they are extra long. Also because I had extra fun making them. Pete got the pre-turkeyday video he shot edited up, and it is now on youtube. Unfortunately, I don't have any still shots of this yet, but I'll link to any Pete puts up, they're all on his camera.
Dec 15th- Now with more pictures! Yay!
The recipe for this is very approximate. It goes something like this: Take about a cup and a half of water, and a half teaspoon of salt, and a tablespoon of oil, and put them in a mixing bowl, or do what I did and use your bread machine. Start mixing in bread flour. Keep adding flour gradually until the dough pretty much doesn't want to accept any more flour. Knead it until it's smooth, then put it in tupperware and leave it to sit on the counter overnight. In the morning, poke the dough. If it feels pretty sticky, turn it out and knead in about another 1/4 cup of flour. Knead it as smooth as you can get it, then put it back in its airtight box for at least 8 hours. You don't have to use bread flour, Dad never did. That's just what I always have most of.
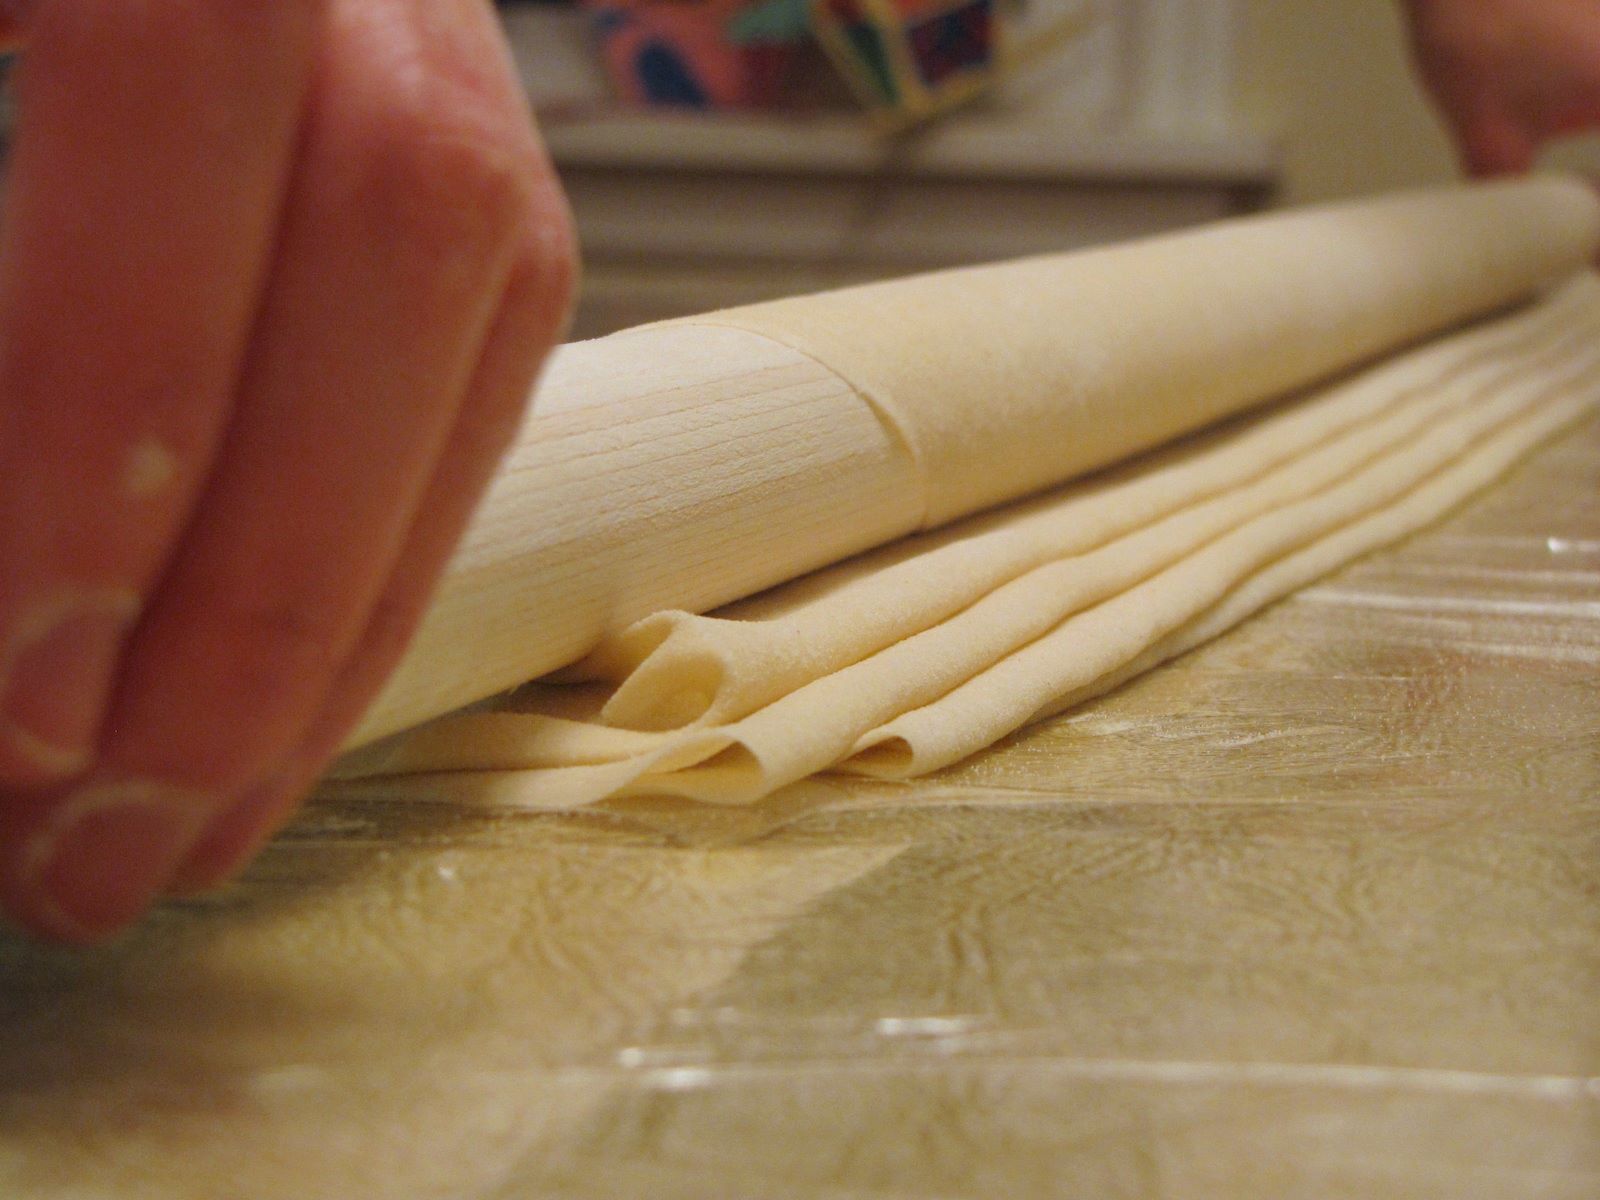
Here's the video. It shows what to do with the dough. I have some things to say about it: WOW do I sound dorky...please ignore the audio, it is entirely irrelevant. Also, it has been edited down a great deal, because rolling a glob of dough 25 times or something is very boring to watch. Dad had a 5 or 6 foot piece of plywood set up on legs in the basement for doing this; we wrapped the dining room table with cling film. The thing I'm using to roll it out with is a dowel pete got at Fred Meyer. For true authenticity, you should saw the handle off a shop broom, sand most of the paint away and use it. Yes, Dad did do that.
On a more practical note-
1. Sprinkle on lots of flour in between rollings, or the dough will stick to itself. The expansion of the dough is caused primarily by pushing the dough out towards the ends of the dowel as you roll, rather than by squashing downwards.
2. It would be better to leave the dough for longer than 8 hours in the second resting period if at all possible. You can't see it well in the video, but my dough had a strong desire to shrink back up. If you leave it longer than overnight, refrigerate it so it doesn't ferment. I seem to remember there being noodle and potsticker dough resting for days at a time in the fridge when I was a kid.
3. The dough is slightly less than 1/16th" thick when it's done. Try to cut them no wider than 1/4".
4. That oil is HOT! Be careful of the steam! Don't drop the noodles in from a great height, or you will splash boiling oil on you! Get close to the oil surface, release the noodles, and get your hand out of the way. Yes it is rather dangerous, that's why I made my brother do it.
5. They will cook in less than 15 seconds. The wire strainer thing is for corralling the noodles into a disk as they crisp up, as well as for getting them out at the end.
Incidentally, chow mein was not the primary use for these noodles when we were kids, or at least, not how they were eaten by just our family. Dad did his crazy illegal catering thing, and people had him make chow mein for that, but usually the reason he made noodles for us was birthdays. Instead of frying them, he boiled them like any other fresh pasta, and put on a very salty sauce made with soy sauce, hoisin, ham bits, green onions, sesame, and garlic. These were 'chang sho mein', that is, long life noodles. The length of the noodles is supposed to be auspicious, and the correct protocol is to slurp them up without biting them to pieces.
Addendum: We had breakfast with my chinese cousins this weekend. Henry said that I roll noodles just like my grandmother. This was astonishing to me, since I have no memory of her ever doing it, except maybe one time when she rolled the dough around the pin about one time to show that she still remembered how. I'm not sure that's a true memory, since I would have been very small. It seems that she taught my dad how to do it. And all this time, I just figured dad learned from some disreputable roadside noodle vendor in Shandong back in the dark ages.
Ah, there had been *ahem* some drinking involved...
Saturday, November 6, 2010
Wears Like Iron
Among many other family artifacts my Mom sent out to Portland were a couple cast iron pans. I got 'em, cuz my sibs are already fixed for that kind of stuff.
These weren't the first ones I've owned- in the last year or so I picked up 2 excellent ones at goodwill. Of course, the ones Mom sent have personal value due to their being the ones Dad used since Idunnowhen, but there are things I like about the goodwill finds too. They came from goodwill, duh, so they're awesome. I think I paid about 8 bucks a piece for them, which is about what they would have cost new. In another class of item (hellllooo!?! IKEA svalka wineglasses retail at $4.99 a 6-pack-don't think I'm gonna pay 99 cents each for a bunch of dinged up ones!), paying the same as for a new one would be foolish. In a cast-iron pan, years of hard use are a material advantage. The skillet on the right rear burner also has the inscription "D. Baldyy" scratched into the oxidized material of the handle. At least, I think that's what it says. I couldn't say why I like that so much. The pan in front of it I got a couple weeks ago. It's smaller, and weighs a lot less. Also, it's ambidextrously cast, that is, it has pouring "ears" on both sides. Baldyy has a spout only on the left side, which means it assumes that you'll pick it up with your right hand. Since it weighs a ton, and I'm right handed, that makes a certain amount of sense until I go to scrape the pan out and realize that I'm clumsy with a spatula in my left hand. I'd rather lift left-handed and scoop right. Dweebity, whatever. The little pan works well either way and is a pound or more lighter.
On the left are the pans mom sent. In front is a skillet that, while it is the same diameter as the larger of my goodwill scores, still weighs less. This runs with what I've heard about vintage cast iron: that one of the desirable features of some really old pieces is that it was cast in thinner molds. They have the same dimensions and durability as newer items, but are easier to sling around. This one was coated with dust & polymerized grease, and had a couple mouse turds adhered to it for lagniappe. Oh yeah. Plus, it's also got the two spouts. The thing in the back is larger and deeper than I think I'm ever likely to need, but I might try making bread in it. The seasoning on it had degraded pretty badly and it was showing a lot of rust when Jej pulled it out of the box. Does anybody remember if Dad used that thing to cook his picnic hams? Or bake bread in? Anyway, it's a no-foolin' piece of ironmongery.
So what did I want to take on these grotty old things for? It took about half an hour of elbow grease, baking soda, and cooking oil to get those 2 pans back in really decent shape. I'm pretty confident that they'll cook really well when I try them out, but it was kind of an effort.
Because they are simply better than anything else at what they do. There's a reason there are so many teflon pans at goodwill- the damn things wear out. They also aren't safe at high temperatures. You heat up a teflon pan under a broiler and everything you eat is gonna get a nonstick coating. You could invest in fancy enamel LeCreuset or some shit. I mean, I love mine, but again- I thrifted it. Enamel is easy to clean and safe at high temperatures, but once you whang a hole in it, you might as well throw the pan out, and some of that stuff is mighty costive. Or you could buy stainless. You'd pay the same or nearly as much for All-Clad, or something else that would give you equally good heat distribution, and you'd save on weight. Or you could pay a tenth the amount for cast iron. At any rate, unlike either teflon or enamel, the nonstick coating that develops on a cast-iron pan is continuously self-repairing. I think that's the feature that beats the heck out of all other choices for me. Low-tech beats high tech on safety, durability, and effectiveness, plus throws in the magic Accio Reparo! function at the end. I love that.
Labels:
cooking,
cooking tools,
geek,
goodwill,
harry potter,
thrift stores
Thursday, May 6, 2010
Yogurt
Last spring I started making my own yogurt. Then by fall, I got tired of it. It took too much time, I eat a ton of it, and I was always having to make another batch at some inconvenient time. So I started buying it again. That's when it occurred to me that the solution was not to stop making yogurt, but to make bigger batches. Duh. The cost/benefit ratio only gets more favorable, besides not having a zillion little pint-sized plastic things around to throw away. Like 2 or 3 a week!
I posted a very similar set of instuction on facebook a while ago, but my procedure has evolved slightly since then. At any rate, here it is. Keep in mind, I make greek-style strained yogurt.
Buy an 8oz thing of Fage brand plain yogurt.
Buy 1 gallon of milk. I get a half each of whole and 2%. More fat = good. Low fat foods just do not satisfy you, and what's worse, will encourage you to overeat cus hey, it's low fat! Full fat foods make you happy, and more happy = good. Nuff said.
Here is my equipment list:
1, 2-gallon stockpot, with a lid
a whisk- you will need these 2 things the first day.
the next day ( or possibly later the same day) you will need:
A big pot with a lid to boil the heck out of anything that is going to touch your yogurt OR a dishwasher. I boil things.
A couple clean spoons or spatulas
A pair of tongs is useful for grabbing hot things out of boiling water.
A large wire colander. Mine is about 14" across and almost 9" deep.
A circle of muslin big enough to line the colander and have a little extra wiggle room
A small glass jar with a lid to keep a bit of yogurt as starter for your next batch. That way you don't have to buy more brand-name yogurt, which effectively doubles the cost of making your own.
The third (or maybe second) day you will need storage containers to hold a half gallon of greek yogurt.
Procedure:
Leave the milk and yogurt on the counter to start warming up. You can put the yogurt container in a little dish of warm water to get it woken up, it seems to speed up the process.
Put about 3 cups of water and the whisk into the stockpot, put on the lid and boil it for about 5 minutes. This sterilizes it. Set the whisk aside somewhere clean, dump out all the water and put in the milk. Gently heat the milk to somewhere between 90 and 100 degrees. You don't want to burn it or shock the starter when you add it. Once the milk is up to temp, whisk in the bought yogurt, put on the lid and leave it alone.
The important thing is to keep it warm for the next 8 to 12 hours. I turn on my oven light, boil a kettle of water, then put the yogurt pot and the kettle together into the oven. Between the bulb being on and the hot kettle, this works beautifully. It will not do anything at all for a good 8 hours! Do not keep fiddling with it, it will get germy and fail to keep well.
After about 8 hours, peek at it. If it smells yogurty and appears to have curdled, it's done. If it doesn't, stir it well ONCE with a clean spoon, put the lid back on and go away for a few more hours. Don't worry if it seems to be taking a long time, I've had batches that took almost 24 hours, and some as few as 8. Depending on how much time you have, once it curdles, you can either stick it in the fridge and wait till the next day, or go right on to the next step:
Put the small glass jar, its lid, and the cloth circle into a big pot with a couple cups of water. Boil/steam the heck out of them for 5-10 minutes, then dump out the water. Fill the little jar with some of your starter. If you have any left (I always forget to save some), add a bit of fresh milk so the starter will have some food. Put that in the back of the fridge til next time. Then line the colander with the cloth, put the whole business over the big pot, and pour the yogurt into it. The more curdled bits will have settled to the bottom, scoop them out too. Cover the colander and put the whole thing in the fridge for 24 hours. By that time enough whey will have drained out that it will be about as thick as sour cream. You can leave it longer and it will get almost as thick as cream cheese, but that's up to you. Put it in storage containers and that's it!

Now, what if you don't want greek yogurt? What if you want little lunch-sized things of regular yogurt? Well, that's where a dishwasher would be real handy. Here's what I suggest. Use a different starter- stonyfield, brown cow, whatever, as long as it has active bacterial cultures in it. Do the first step, and while you're gently heating the milk to add the starter, run the dishwasher with enough little jars and lids to hold your whole batch. That's like, 16. Put the yogurt mix straight into the clean jars, put on the lids, and incubate them the same way as above. Don't be tempted to shake them around though, you'll wreck the texture. You'll be able to see when they've set, and then you're done!
I posted a very similar set of instuction on facebook a while ago, but my procedure has evolved slightly since then. At any rate, here it is. Keep in mind, I make greek-style strained yogurt.
Buy an 8oz thing of Fage brand plain yogurt.
Buy 1 gallon of milk. I get a half each of whole and 2%. More fat = good. Low fat foods just do not satisfy you, and what's worse, will encourage you to overeat cus hey, it's low fat! Full fat foods make you happy, and more happy = good. Nuff said.
Here is my equipment list:
1, 2-gallon stockpot, with a lid
a whisk- you will need these 2 things the first day.
the next day ( or possibly later the same day) you will need:
A big pot with a lid to boil the heck out of anything that is going to touch your yogurt OR a dishwasher. I boil things.
A couple clean spoons or spatulas
A pair of tongs is useful for grabbing hot things out of boiling water.
A large wire colander. Mine is about 14" across and almost 9" deep.
A circle of muslin big enough to line the colander and have a little extra wiggle room
A small glass jar with a lid to keep a bit of yogurt as starter for your next batch. That way you don't have to buy more brand-name yogurt, which effectively doubles the cost of making your own.
The third (or maybe second) day you will need storage containers to hold a half gallon of greek yogurt.
Procedure:
Leave the milk and yogurt on the counter to start warming up. You can put the yogurt container in a little dish of warm water to get it woken up, it seems to speed up the process.
Put about 3 cups of water and the whisk into the stockpot, put on the lid and boil it for about 5 minutes. This sterilizes it. Set the whisk aside somewhere clean, dump out all the water and put in the milk. Gently heat the milk to somewhere between 90 and 100 degrees. You don't want to burn it or shock the starter when you add it. Once the milk is up to temp, whisk in the bought yogurt, put on the lid and leave it alone.
The important thing is to keep it warm for the next 8 to 12 hours. I turn on my oven light, boil a kettle of water, then put the yogurt pot and the kettle together into the oven. Between the bulb being on and the hot kettle, this works beautifully. It will not do anything at all for a good 8 hours! Do not keep fiddling with it, it will get germy and fail to keep well.
After about 8 hours, peek at it. If it smells yogurty and appears to have curdled, it's done. If it doesn't, stir it well ONCE with a clean spoon, put the lid back on and go away for a few more hours. Don't worry if it seems to be taking a long time, I've had batches that took almost 24 hours, and some as few as 8. Depending on how much time you have, once it curdles, you can either stick it in the fridge and wait till the next day, or go right on to the next step:
Now, what if you don't want greek yogurt? What if you want little lunch-sized things of regular yogurt? Well, that's where a dishwasher would be real handy. Here's what I suggest. Use a different starter- stonyfield, brown cow, whatever, as long as it has active bacterial cultures in it. Do the first step, and while you're gently heating the milk to add the starter, run the dishwasher with enough little jars and lids to hold your whole batch. That's like, 16. Put the yogurt mix straight into the clean jars, put on the lids, and incubate them the same way as above. Don't be tempted to shake them around though, you'll wreck the texture. You'll be able to see when they've set, and then you're done!
Tuesday, December 1, 2009
More about pastry tools
I've made more pies this year than at any time before in my life. Maybe more than the previous lifetime total. It's the crust. I have a new favorite tool:
it's a really fancy pastry cutter. It's made out of a solid piece of really heavy stainless steel, and the handle is stuck onto the blade with these big screws and rubber gaskets. It cost me a whole $1.99 at Goodwill.
I have another one, the usual sort. Wooden handle, a bunch of curvey wire loops. Also $1.99 at Goodwill. It's perfectly adequate, I recommend one for occasional or desultory pastry-makers, because it beats the heck out of a fork. I almost passed up my fancy one, because I had one of the regular kind already, but I picked it up and went oooOOo...
The handle doesn't swivel, for one thing, so when you're bashing away at a pile of hard butter and flour, the blades never flip out sideways. And the blades are rigid. They don't spread apart, leaving unevenly large chunks of fat. And the solid parts of the blade above the cutters make a nice ergonomic grippy place for your thumb to go.
Since I got this thing last month or so, it has chewed through 2 big batches of chocolate shortbread cookies, and 2 pie crusts with incredible ease. I love it. Now all I need is a french rolling pin. My current one got called out yesterday morning.
"Was your rolling pin part of a broom handle?" uh, mm-hm. I think Dad made it...
Subscribe to:
Posts (Atom)