Showing posts with label cookies. Show all posts
Showing posts with label cookies. Show all posts
Sunday, June 16, 2013
Mexican Wedding Cookies
I keep thinking that the name for these things is probably apocryphal. I don't have any reason to think that, but I do. I think it about Italian Wedding Soup too, but I don't like Italian Wedding Soup, so I don't care. These cookies are excellent though, so I worry that I am calling my delightful little cookie nubs something that an actual Mexican person might roll their eyes at and think 'Stupid gringos, what do they know from Mexican weddings, anyway?' Never mind.
It is a super easy recipe. I followed it exactly. Unfortunately, I don't remember where I got it.
2/3 cup (65 grams) nuts
1 cup unsalted butter, at room temperature
1/4 (30 grams) cup powdered sugar
1 teaspoon vanilla
2 cups (260 grams) all purpose flour
1/4 teaspoon salt
more powdered sugar for rolling the cookies in
Toast the nuts lightly. Put them in a processor with a couple tablespoons of the flour and process them until they are finely ground, but haven't turned into paste.
Beat the butter and powdered sugar together. Beat in the vanilla and salt, add the nuts and remaining flour and beat until combined. Refrigerate until firm, about an hour.
Pre heat oven to 350. make 1" balls of dough and place them 2" apart on cookie sheets. Bake for 15 minutes. Let the cookies cool for about 5 minutes. While they are still warm, roll the cookies in powdered sugar. Place the sugared cookies on paper towel to cool. Ta da! Cookies.
Things to know:
1. Do use butter that is at room temperature. If it is too cold it will be hard to beat, and if its too warm, it will separate and the texture of the cookies will be hard.
2. Be gentle when rolling the cookies in sugar. They are very delicate and will crumble up if you bash them around.
3. I used walnuts. Some people don't like walnuts, because they have those slightly bitter papery husks, but these cookies are very bland by nature so I wanted the hint of astringency to balance it out. I bet hazelnuts would be good, or pecans and rosemary. Or pine nuts and orange zest. Hmmmm....
4. They will absorb a great deal of powdered sugar. Don't be shy, go ahead and smother them in it.
5. If you have a scale, do use it. The volume of powdered sugar in particular is highly variable, so the most accurate way of measuring it is by weight. 30 grams is 30 grams whether you cram it into a quarter of a cup or fluff it up to occupy a third.
6. The recipe says to use unsalted butter, so I did, because I actually had some. But next time I will probably like salted butter better, because once the cookies cool down, the savory contrast of the dough with the sugar coating flattens out a bit.
These are really lovely things. The dough is only mildly sweet, so the sugar coating isn't overpowering, and they are astonishingly delicate in texture for something that has such a high proportion of butter and nuts, and no leavening. I think this is partly due to the powdered sugar (which contains cornstarch) in the dough, but mostly to the behavior of butter itself. In the U.S., butter is legally required to have something like 83% milk fat in it. Which means that out of 1 cup of butter, a little less that 1/5 of it is actually water and milk protein and whatnot. That isn't enough to toughen the gluten in the flour, but it is enough to create a teensy bit of steam during cooking so that the starches fluff up a tad and the escaping water vapor creates a slight leavening effect. The result is a cookie that holds its shape just until you bite it and then dissolves with a slight crunch.
I think they're superb. I ate them instead of toast for breakfast today.
Saturday, April 21, 2012
Granola Bars
I am a secret hippy. The smell of food co-ops makes me all nostalgic, because I hung around so many hippies when I was a kid. There is something about the type of utterly sincere yet completely dodgy presentation food co-ops have that feels very homey to me. I started thinking about it after I made these when I had a huge jones for granola bars last week. The toasty oatmeal and burnt raisin aroma kinda brought it back for me. Probably the sugar rush might have had something to do with the sudden feeling of well being too. These are not some dreary, self righteous wrestling match for your jaw and GI tract, they are cookies, by goll, and they are delicious. They are also good for breakfast, smushed into warm milk, with sliced bananas.
2 1/2 cups old fashioned oatmeal
1/2 cup raw sunflower seed kernels
1/2 cup toasted nuts
1/2 cup raisins
1/2 cup chopped date bits
1/4 cup toasted flax seeds
1 T butter
1 t oil
1/3 cup honey
1/3 cup brown sugar
2 tsp vanilla
pinch of salt
Put the oatmeal and the sunflower seeds on a sheet pan and toast them at 350 for about half an hour. Stir them every few minutes, or they will burn. When you take them out, turn the oven down to 300.
Put the butter, oil, honey, sugar, vanilla and salt in a small sauce pan over medium heat and stir until the sugar has all dissolved. Mix all the ingredients together and press into an even layer in an oiled 9 x13" pan. Bake for half an hour. Let them get mostly cool before you cut them into bars.
notes-
1. The kind of nuts and seeds you use is really not important. Basically you have 2 and a half cups oatmeal to one cup fruit and one cup nuts and seeds. Mine have hazelnuts, because that's what I got. I did this with sesame seeds once before this post, and they were a tad bitter; flax seed is more popcorny.
2. It's important to get the ingredients toasted. They taste better.
3. These get sticky mighty fast. Keep them in an airtight container or wrap them individually.
4. They are really sticky before they are cooked too. Use one of those silicone spatulas to press the mix into the pan or it will get all over your hands. Press them down again as soon as they come out of the oven too, since they will poof up a bit as they bake.

Saturday, November 19, 2011
Tea Party Cookies!
In the dim and murky past, I used to go to church. I can only say that without doubt, the coffee hour in the basement fellowship hall was the best part. Around the holidays, there was a charity bazaar, where I acquired a sterling silver necklace, ( it looked fabulous with my oversized turquoise sweater ), a wooden rhinocerous, and probably other things I've forgotten. There was always punch for kids, and sometimes there were cookies. I think the presence of cookies may have been related to events in the ecumenical calendar, but I wasn't paying attention. Cookies! That was the important part.
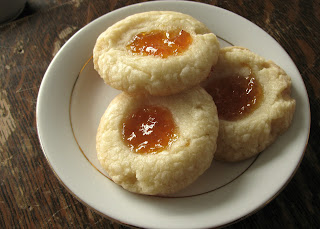
There were 2 kinds of cookies that I liked best. One was lemon bars, naturally, and the other was any type of thumbprint cookie. Some were fancier than others. They looked like they had been extruded from a pastry bag, with little ridges in the swirls, or they were like layer cookies with a hole cut in them so you could see the jam. (I now know that cookies like that are linzer cookies, but they looked similar to me.) I think most of those thumbprint cookies had to have been store bought, because they usually had that wonderfully tropical tasting palm oil flavor.
Part of my enjoyment of this type of cookie is aesthetics. They look delicious. And they're cute. They're dainty looking. And of course, I could eat about, oh, a zillion of them. I have always loved the combination of shortbready cookie base with a chewy fruit blob in the middle. Raspberry is probably my favorite, if I must choose, because I really like pink flavors of food, but then again, the yellow flavor is good too.
Thumbprint Cookies
1 cup butter
1cup powdered sugar
2 cups all purpose flour
1/2 teaspoon vanilla
1/4 teaspoon salt
jam
Cut the butter, sugar, salt & vanilla together until they are pretty well mixed, then cut in the flour until the dough is evenly smooth and holds together easily. It will be very stiff and pasty. Pull or scoop off 1" balls of dough, flatten them slightly, and poke a dimple into the top of each one. Start pre-heating the oven to 350. Freeze the cookies for at least 20 minutes, then arrange them on a baking sheet sheet about 2" apart. Drop about 1/4 teaspoon of jam into each dimple, and bake the cookies for about 15 minutes. They should be just barely turning brown at the edges.
Useful points:
1. Use a pastry cutter. If you use a mixer, you may fluff too much air into your dough. That would be ok, but be aware that the cookies will first poof up, then collapse in the oven, making them rather flat.
2. That's 130 grams of powdered sugar, to be exact.
3. It's important to freeze the cookies before baking them. They will hold their shape much better.
4. I used a melon baller to scoop evenly sized bits of dough, because an ice cream scoop is way too big.
5. You can use your finger to put the dimples in the cookies (duh...) but I found that the back of my 1/4 teaspoon measure creates a nice, symmetrical dent, which I already know will hold exactly 1/4 teaspoon of jam.
6. Don't forget to eat one or two the minute they come out of the oven, because they will be quite crunchy when they cool down. It would be a pity not to know what they are like while they are warm and squishy.
 Obviously, these cookies are related to hamantaschen, but they are a lot less fiddly. I do like the cream cheese dough for hamantaschen, but overall, the simplicity of this recipe wins out for me. On the other hand, at the risk of sounding very unlike myself, I think this recipe may have too much butter. More precisely, I think there is proportionately too much butter for the rest of the ingredients. A lot of the fat in these just oozes right out during cooking, which annoys me. It may need just a smidge more flour, which I should have weighed before mixing these up, but oh well. Next time. There will be several next times too, because that peculiar jam I got is just perfect for making these, which makes me feel much better about having bought it.
Saturday, September 17, 2011
Lemon Dilemma
Because I am a single gal, I usually don't use a whole lemon before it gets all wizened into a rock. I solved that problem by keeping lemon wedges in the freezer, but one consequence of freezing lemons is that when you thaw them out, the lemon oil in the rind tends to make your food bitter.
The lemon zest is where most of the oil in the rind is- which is a good thing if you want a pinch of it minced up to flavor something with. Not so good when you microwave a frozen lemon and you can't control how much peel flavor goes into your lemon juice. I decided that was something I could live with if it meant that I could have fresh tasting lemon juice without wasting most of a lemon, until I read somewhere that you can preserve lemon zest in salt or sugar. Hmmmm. If I zipped all the outsides of my lemons off before freezing them, I would have solved the bitter-lemon problem, as well as saved the good parts of the rind for something else, right? So the last time I bought half a dozen lemons, I saved the zest in a pint jar of sugar.
Well, now I have 2 cups of lemon sugar to use up. No big deal, but who on earth actually uses as much lemon zest as that? Next time, I think I'll just freeze some of it separately and make myself throw the rest away, like a sensible person. Meanwhile, here are some lemon bars.
2 cups all-purpose flour
1/2 cup powdered sugar
3/4 cup butter -I use salted. If you don't, then add 1/4 tsp salt to the crust.
5 eggs
3/4 cup lemon juice
1 1/2 cups sugar- I used 1 cup plain, 1/2 cup lemon sugar.
1 tsp baking powder
1/4 cup flour
1/4 tsp salt
Pre-heat the oven to 350. Line the bottom of a 9x13 pan with waxed or parchment paper.
Cut the first 3 ingredients together with a pastry tool. Unlike normal pastry, you don't want to leave butter lumps in the dough. It's done when it looks almost moist, but still crumbles easily. Dump the crumbs into the pan, distribute them evenly over the bottom, and then press them down firmly into a nice solid crust. Prick the crust all over with a fork to prevent it from bubbling up in the oven, and bake it for about 13 minutes. It should be barely browned around the edges by that time. Remove the crust from the oven, and turn the heat up to 375.
Beat all the rest of the ingredients together until completely combined. Pour over the crust, and bake for 15-20 minutes, or until the filling has set. When they are cool, sprinkle the tops with powdered sugar and cut them up.
Notes:
1. While the bars are still hot, take a very sharp, thin, knife and run it around the edge of the pan to separate the bars from the baking dish. On a related note,
2. Don't be tempted to use a non-stick pan. Even if the bars don't stick to the sides of the pan, you still have to cut them up, which will just gouge holes in your teflon. I am against teflon anyway.
3. You really do have to wait until they are cool to put the powdered sugar on top. If they are still warm, the steam coming off the bars will just make the sugar dissolve. I think Harriet did that once. They still tasted fine, but they didn't look the same and the tops were pretty sticky.
4. The amount of time the filling will take to set up depends on how cold your ingredients are. I use eggs right out of the fridge, so they take on the long side to cook.
5. Oil the knife you use to cut them with. This part isn't mandatory, but it makes them come out prettier, because they stick to the blade less.
This is a pretty good formula. It makes a good sized batch, with a nice proportion of lemon stuff to crust. I looked up a bunch of recipes before I made these, and I think I incorporated the main features that attracted me to each. I used less total sugar than most recipes called for, and more lemon juice. I added an egg to compensate for the extra juice, which had the added benefit of increasing the total volume of lemon goop to slightly greater than 50% of the finished confection. There is just enough flour in the filling to give it some stability, and the baking powder adds a bit of fluff.
The powdered sugar in the crust is indispensable for creating the texture which is such a key part of the lemon bar mystique. Granulated sugar tends to make a tougher pastry, both because the larger particle size makes the sugar distribute differently in the dough, and because powdered sugar has quite a bit of cornstarch in it as an anti-caking agent. I'm pretty sure that it's mostly the cornstarch which makes the crust both tender and dense, as a lot of shortbread recipes call for it. Incidentally, if you measure ingredients by weight, this takes about 65 grams of powdered sugar in the crust.
Friday, April 1, 2011
Hamantaschen
Sick of the cabbage yet? Yeah, me too. Have a cookie.
Cookies with stuff in them usually look too fiddly for me to bother with. I think that after my xiao long bao experiment, my idea of what constitutes 'fiddly' underwent a change. I read this recipe in the paper and thought it looked remarkably simple. The photos in the paper looked really good too, maybe I hadn't brought enough snacks with me to work that day. So here they are.
2 sticks (1 cup) butter
1, 8-oz brick cream cheese
6 tablespoons sugar
1 teaspoon vanilla
2 1/2 cups AP flour
1/2 teaspoon salt- you will want this if you use unsalted butter. I don't.
later you will need about 2 cups of jam and an egg for egg wash
I got 46, 2" cookies out of this.
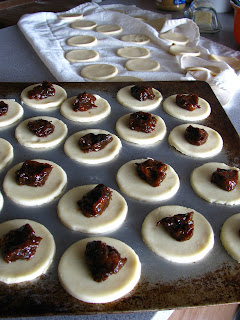
Soften the cheese & butter to room temperature, then beat them together until they are well combined. Beat in the sugar and vanilla. You can use a spatula for this part. Then switch to your trusty pastry tool, and cut in the flour. As soon as all the flour is taken up, scrape down the bowl one last time and put the dough in tupperware to chill overnight. The next day, roll out the dough until it's between 1/4 and 1/8 inch thick. I have no cookie cutters, but the lip of a red wine glass is just the right size.

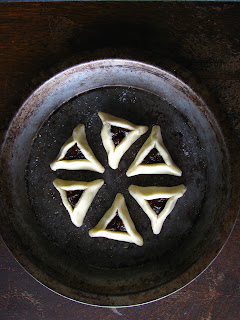
Each cookie will need about 1/2 teaspoon of jam. Fold up the cookies and put them on sheets in the freezer. Preheat the oven to 350. Once the cookies are frozen hard, you can put an egg wash on their outsides and sprinkle them with a bit of sugar. I did this on my second tray, and it does make them look much nicer. Bake them for about 30 minutes.
Notes!
 1. It doesn't seem to be very important that the butter/cream cheese mixture is "fluffy" as stated in the original recipe.
2. But it is important that when you add the flour, you don't over-work the dough. That's why I strongly recommend the pastry cutter- it will quickly incorporate the flour without causing the gluten in it to sieze up and get rubbery.
3. A pastry cloth helps a lot.
4. Try to cut the circles as efficiently as possible, because while you can squash the leftover dough together and roll it again, each time you do that you will loose some of the tenderness in the finished cookie. 2 squashings and re-rollings is the maximum I would recommend.
5. Also, chilling the dough is indispensable. The first time because it is too gooey to manage otherwise, the second time because freezing will allow the cookies to retain their shape in the oven.
6. The original recipe says to paint a little egg wash around the edge of each dough circle before folding them up. I didn't do that, and as a consequence, some of my cookies unfolded while baking. If you are picky, or if your jam is a rather moist variety, I would say that you should take the trouble to do the egg wash. I'm lazy, and my jam was very sticky, so I decided to live with some amorphous cookies.
7. I made my own jam. It's just about 2/3 of a bag of prunes simmered until they're falling apart and then bashed up with a spoon. This sounds less appealing than it really is, but I did it because a) it allowed me to control exactly how much sugar, moisture, and texture was in the jam, b) plum filling is traditional, c) I like the caramelized bits that you end up with. They're chewy.
These are very, VERY hard to stop eating. The cookie part is really just an amazingly good pie crust, and if I want to make any sweet pies in the future, I'll have to think about using this recipe. It is tender, yet holds its shape, it puffs ever so slightly as it cooks, and it has a hint of flakiness. These are phenomenal while they are hot out of the oven, but once they cool, the cream cheese flavor in the crust comes back out, and the jam filling gets extra chewy.
I had to give 3/4 of the recipe to my siblings immediately. Even so, I caught myself thinking "So you ate 6 cookies earlier. That's not much different than say, a PBJ, right? And there are 6 cookies left. I could have those for dessert. That's like, one slice of pie...
Tuesday, October 27, 2009
Cookie Lesson
Two lessons, in fact.
1: It pays to follow directions
2: It pays to improvise
I had a jones for chocolate cookies. I got me a goodlookin recipe:
2 cups confectioner's sugar
3/4 cups dutch process cocoa
3 1/4 cups all purpose flour
1/2 tsp salt
1 1/2 cups butter (!)
1 tsp vanilla
2 eggs
Sift all the dry ingredients together into a large bowl. Cut in softened butter until evenly combined. A few little lumps are ok. Mix eggs & vanilla and add to dry ingredients. Mix until it forms a mostly smooth ball.
Bake cookies for 8 minutes at 350.
I followed it. Wow, huh? And then the dough turned out way too gooey for rolled cookies, which is what it was supposed to be. Well, I knew that might happen, the recipe reviews said it might, but what to do next? I didn't want to sit around waiting for it to harden up in the fridge, which was the suggested fix.
But I do have a totally neato vintage cookie press. Ha-HAH! It worked beautifully. Better than I had ever gotten the darn thing to work before, in fact.
So, who wants to have a tea party?
Subscribe to:
Posts (Atom)


