Monday, April 25, 2011

Magic Soup 2


Some of you may remember my first set of instructions for magic soup. It isn't really a recipe as much as it is an assembly outline, but it makes a tasty, attractive looking, light meal very quickly.

2 cups soup stock
1/2 block tofu, cubed
1/2 a dried kaffir lime leaf
1 teaspoon fish sauce
1/4 lemon
a couple slices of ginger

simmer everything together for maybe 10 minutes, tops. Throw out the lemon. Serve topped with:

minced cilantro
green onions
a few sliced sugar peas
a couple little tomatoes
a pinch of toasted garlic chips
sesame oil

a couple things-

1. I used firm tofu. Soft is fine, but it tends to disintegrate with boiling.
2. You can use all sorts of veggies, but since you aren't actually cooking them, stick with delicate varieties. Sugar peas, mung bean sprouts, jicama, red or yellow bell peppers, these all have the same sweet/crunchy combination which is a good contrast to the tart soup and the soft tofu.
3. I used a spoon of broth concentrate for stock. It's totally legit, in my book.
4. You could probably do this vegan. Use veggie stock and swap soy for the fish sauce. If you do though, don't skip the garlic, and probably not the tomatoes. Both those things have high concentrations of amines which will give you a more satisfying flavor in the absence of meat protein.
5. Fresh herbs! 

This soup was brought on by remembering vietnamese hot & sour soup at Dalat. They put pineapple, bean sprouts, shrimp, mushrooms and other stuff in it, which sounded perfectly horrid the first time somebody told me about it. It's delicious though. I suspect that they use white pepper to season their soup, which I don't have, so I skipped the spicy thing this time around. Don't let that stop you though, if you likes the hot, go for whatever strikes your fancy.

Wednesday, April 20, 2011

Chicken and Majaddara


What makes something authentic, anyway? What's the cutoff point at which something stops being what it purports to be? In the case of food, who gets to decide? I got this rice mix at TJ's to see what it was like, and it's pretty generic, I think of it as being typically 'american' flavored. It's got long grain rice, wild rice, and a bunch of dehydrated vegetables in it. Looks great in the bag, plenty less so once you cook it up. By itself, it's awfully blah. It's rice for people who don't want to eat rice, but aren't adventurous enough to go out and get something with texture or flavor. This is what despairing non-cooks will slap on their oafish menfolk's plates in the hope of getting them to eat anything except white bread and a pound of bratwurst for dinner. I tried making risotto with it, which tasted ok, but I might have known it would lack the creamy texture that makes risotto worth stirring for half an hour.

Then I thought of majaddara. Nicholas' Restaurant has amazing majaddara. I looked up a bunch of recipes, and they're all just 3 things: lentils, rice, fried onions. The flavoring agents range from salt only to any combination of salt, pepper, allspice, bay leaf, cloves, cinnamon, cumin, cardamom, coriander, lemon rind, fennel seed, and nutmeg, plus maybe other things. Which brings me back to the authenticity thing. I don't actually care that much about authenticity, especially in food, but I did feel like the vague instructions in some of the recipes to use whatever I feel like to tart it up gave me the green light to use this bastardized rice for majaddara. Good thing, because otherwise I think that rice would have stayed in my cupboard until it got infested by meal moths.

Majaddara according to me:

1/2 cup rice
1/2 cup lentils
2 or 3 allspice berries
1 or 2 cloves
1 bay leaf
a couple pinches cumin
salt
olive oil
the fried onions from the previous post

yogurt, chopped mint, oregano & parsley for serving

Cook the rice & lentils separately, because they get done at different rates. I salt the water for the rice, but not the lentils. Cook the rice as you normally do, but add the spices. Cook the lentils as though you were making pasta, again with the spices in the water. I used red hulled lentils, which cook very fast. Because they are hulled, they tend to disintegrate quickly. I solved the problem by just cooking them until they were barely done, then draining them quickly and putting them back in the warm pan with a little olive oil and a dash of salt. This let them continue softening up while the rice cooked. I also pulled out the bay leaf and allspice to keep flavoring the rice. When the rice is done, throw out the cloves, leaves and berries, and mix the lentils, rice, and onions together.

The chicken that went with:

2 chicken thighs
1/4 lemon, chopped into 1/2" bits
2 green onions, chopped
salt & pepper
1/2 teaspoon cumin
1/2 teaspoon crushed coriander seeds
a pinch of cayenne
about 1/4 teaspoon  pumpkin pie spice
about 3 tablespoons olive oil

 Marinate the chicken for about 2 or 3 days with all the other ingredients. I recommend pan-frying the chicken, unless you have a grill and want to cook it that way. The benefit of the frying pan is that the marinade reduces to a zippy glaze. Throw out the lemons halfway through cooking if you do that, or the rinds will overpower the rest of the flavors. On the other hand, grilling makes most things turn out pretty well. That's what Pete does, and it's his recipe. Except for the pie spice- he uses cinnamon sticks, but I don't have any of those.

Friday, April 15, 2011

Warm Tuna Salad with Caramelized Onions


This was prettier than I expected it to be. A couple things happened which made my lunch more than just a quick nutritional fix. Firstly, I made caramelized onions last night. Everything I own is now imbued with a subtle aroma of fried onions. I spent the morning wondering if the people I talked to at work could smell it, because I certainly could. Secondly, I didn't have to go to my afternoon job today, so I went to the grocery store on my way home instead of eating in the cafeteria. I always end up with more interesting things if I shop hungry, because I will actually feel like buying food. So I got salad greens, which I rarely do at this time of year, and the little tomatoes. When I got home, I realized that I had to think up something to do with the greens that could be eaten warm, because my apartment can be right clammy in this weather.

1 can of tuna
about 2 tablespoons olive oil
salt & pepper
juice of 1/4 lemon
3 fresh chives
a 1" sprig of fresh tarragon
a heaping teaspoon of caramelized onions

Mince the herbs and drain the tuna. Mix everything up to taste, and stick it in the microwave for about 15 or 20 seconds. You don't need to cook it, just make it warm. Serve over fresh greens, with tomatoes and a warm boiled egg.

A few things:

1. I bet this would be better if you got the kind of tuna that is packed in olive oil to begin with. I'm going to try that next time.
2. You don't have to hard boil the egg. As with a salad lyonaise, it would be pretty good if you left the yolk runny, and mixed it in as a dressing.
3. The onions are the magic ingredient. I never want to be without them again. They add amazing qualities to the tuna. And everything else. I made them because I want to try a lebanese recipe this weekend, but they may not last that long. I may eat them with a spoon.

Here's how I made mine; they are time consuming, but worth the effort:

4 or 5 yellow onions
3 or 4 tablespoons olive oil
a sprinkle of salt

Slice the onions between 1/8" and 1/4" thick. It will look like a lot, but they loose about 90% of their volume as they cook. Put the oil in a heavy pan at about medium heat. It's best if the pan has a lid, but probably not essential. Put in the onions, sprinkle with salt, and stir them around to get them thoroughly covered in oil. Cover the pan for about 5 minutes to let the onions steam and get translucent, then stir again.

Now, decide whether you want the onions to turn into jam, or to remain onion shaped and a bit chewy. I went somewhere down the middle. If you leave the cover off the pan at this point, the water will cook out of the onions relatively quickly, and they will retain their shape as they brown. If you leave them covered, the trapped steam will encourage the onions to break down and achieve a gooey, jammy consistency. More stirring will also break down the onions, while gently turning them over periodically will help them keep their shape.

In either case, you don't want to use more than medium heat, or you will just burn the onions without getting any of their starches to turn into sugar.

Saturday, April 9, 2011

Potato Pancakes


Not only am I not Irish, I'm not Jewish either. Several weeks ago I went and scrounged a potato pancake that Cynthia and the girls made, and I remembered that I love these things. While I was cooking them, I also remembered that the last time I grated a potato must have been about 12 years ago. Probably about this time of year, while I was prepping the holiday latkes at that deli. (Yes, I know, Passover isn't the latke holiday, that's Chanukah, but it billed itself as a jewish deli, and...you know) I'm sure that's the reason why, in all this time, I have never made latkes again. I worked with a woman who was truly, horribly, injured making latkes. I don't know how many hundreds of pounds of potatoes I had to peel or how may dozens of times I shaved little pieces of my knuckles off with that demonic peeler. Thank goodness for the Robotcoupe. We had a mixing bowl as large as a kiddie pool that we mixed the grated potatoes for the holiday latke recipe in. Sometimes I wish I had one of those industrial food processors. I digress. Please note, that I did not bother to peel my potatoes today.

about a pound and a half of yukon gold potatoes, the newer the better
about 4 tablespoons of flour
about a teaspoon of salt
3 eggs
2 or 3 green onions
2 tablespoons, more or less, minced parsley
some pepper
olive oil for frying

This makes about 8, 4-5" pancakes.

Mince the green onion and parsley, and mix them with the eggs, flour, salt and pepper. Wash the potatoes and grate them into another bowl. Grab handfuls of the grated potatoes and wring out as much water as possible before adding them to the egg mix. You may be tempted to skip this part- don't. Once you get the potatoes mixed in with the salt in the batter, they will sweat out an amazing quantity of water.

Use 2 frying pans. Put about 1/4 inch of oil in each one and heat to medium. When the oil starts to shimmer in the pans, drop about 1/3 cup of batter for each latke into the pans. I can fit 3 latkes into a 10-inch pan. Cook them for about 5 minutes on each side, until they are golden and a bit crispy. Drain on paper towels.

Notes:

1. The potatoes will oxidize very fast. Grate quickly and mix them into the batter just as soon as you want to eat them. At the deli, we used to mix up a water bath with a few tablespoons of an anti-oxidant to grate the potatoes into. The anti-oxidant was this weird substance which demonstrated a property that I learned about in high school which I think is called 'heat of solvation'. That is, when a chemical in crystaline form is dissolved in water, it will release heat, due to the fact that an organized solid is a higher energy state than a bunch of loose molecules floating around in suspension. Some crystals will release quite a lot of energy this way. If you held a scoop of that anti-oxidant and dribbled a little water on it, you could give yourself a significant burn. (That's not what happened to Ann.)
2. As I said, the potatoes emit a great deal of water. You can either squish it out before frying, as I did, to keep your pancakes neat in appearance, or if you like an eggier latke, stir it back in. The last few will be rather sloppy, but will taste good.
3. Medium heat is best. They take longer to brown, but you need to cook them long enough to get the potatoes soft. Crunchy-raw potatoes are not very satisfying to eat.
4. Don't crowd the pans. Too many latkes all at once will generate a cloud of steam which will inhibit crisping. Cooked through is good, soggy is not.
5. You don't have to use yukon gold potatoes, any kind will do just fine. I like that variety because the color is appealing, and because the skins are usually thin and tender enough to dispense with peeling.

I did not have either sour cream or apple sauce, which is ok, because I don't like apple sauce unless I make it myself. Greek yogurt and raspberry jam was very good, and a fried egg is even better.

Friday, April 1, 2011

Hamantaschen


Sick of the cabbage yet? Yeah, me too. Have a cookie.

Cookies with stuff in them usually look too fiddly for me to bother with. I think that after my xiao long bao experiment, my idea of what constitutes 'fiddly' underwent a change. I read this recipe in the paper and thought it looked remarkably simple. The photos in the paper looked really good too, maybe I hadn't brought enough snacks with me to work that day. So here they are.

2 sticks (1 cup) butter
1, 8-oz brick cream cheese
6 tablespoons sugar
1 teaspoon vanilla
2 1/2 cups AP flour
1/2 teaspoon salt- you will want this if you use unsalted butter. I don't.

later you will need about 2 cups of jam and an egg for egg wash

I got 46, 2" cookies out of this.

Soften the cheese & butter to room temperature, then beat them together until they are well combined. Beat in the sugar and vanilla. You can use a spatula for this part. Then switch to your trusty pastry tool, and cut in the flour. As soon as all the flour is taken up, scrape down the bowl one last time and put the dough in tupperware to chill overnight. The next day, roll out the dough until it's between 1/4 and 1/8 inch thick. I have no cookie cutters, but the lip of a red wine glass is just the right size.


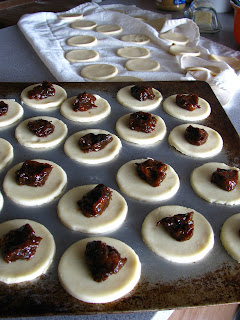
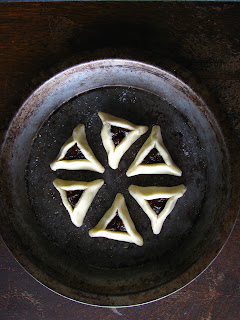
Each cookie will need about 1/2 teaspoon of jam. Fold up the cookies and put them on sheets in the freezer. Preheat the oven to 350. Once the cookies are frozen hard,  you can put an egg wash on their outsides and sprinkle them with a bit of sugar. I did this on my second tray, and it does make them look much nicer. Bake them for about 30 minutes.


Notes!

1. It doesn't seem to be very important that the butter/cream cheese mixture is "fluffy" as stated in the original recipe.
2. But it is important that when you add the flour, you don't over-work the dough. That's why I strongly recommend the pastry cutter- it will quickly incorporate the flour without causing the gluten in it to sieze up and get rubbery.
3. A pastry cloth helps a lot.
4. Try to cut the circles as efficiently as possible, because while you can squash the leftover dough together and roll it again, each time you do that you will loose some of the tenderness in the finished cookie. 2 squashings and re-rollings is the maximum I would recommend.
5. Also, chilling the dough is indispensable. The first time because it is too gooey to manage otherwise, the second time because freezing will allow the cookies to retain their shape in the oven.
6. The original recipe says to paint a little egg wash around the edge of each dough circle before  folding them up. I didn't do that, and as a consequence, some of my cookies unfolded while baking. If you are picky, or if your jam is a rather moist variety, I would say that you should take the trouble to do the egg wash. I'm lazy, and my jam was very sticky, so I decided to live with some amorphous cookies.
7. I made my own jam. It's just about 2/3 of a bag of prunes simmered until they're falling apart and then bashed up with a spoon. This sounds less appealing than it really is, but I did it because a) it allowed me to control exactly how much sugar, moisture, and texture was in the jam, b) plum filling is traditional, c) I like the caramelized bits that you end up with. They're chewy.


These are very, VERY hard to stop eating. The cookie part is really just an amazingly good pie crust, and if I want to make any sweet pies in the future, I'll have to think about using this recipe. It is tender, yet holds its shape, it puffs ever so slightly as it cooks, and it has a hint of flakiness. These are phenomenal while they are hot out of the oven, but once they cool, the cream cheese flavor in the crust comes back out, and the jam filling gets extra chewy.

I had to give 3/4 of the recipe to my siblings immediately. Even so, I caught myself thinking "So you ate 6 cookies earlier. That's not much different than say, a PBJ, right? And there are 6 cookies left. I could have those for dessert. That's like, one slice of pie...