Showing posts with label dessert. Show all posts

Monday, July 2, 2012

Spiced Cream Cakes with Strawberries


Strawberry shortcake is the most photogenic food. It's all pink and white and fluffy, and there are these berries, and these poofs of cream, and there is this crunchy sugar top. It just looks yummy. It helps that it really is every bit as good to eat as it is to look at. I love strawberry shortcake, it was the ultimate dessert when I was a kid. This recipe was not brought on by a sense of boredom with the original, I just became enamored of the smell of indian spice mixes.Technically these are not shortcakes, 'shortcake' being an abbreviation of 'shortening cake', meaning a cake made with shortening. There isn't any shortening per se in these things, the recipe calls for a great deal of heavy cream instead, but everybody knows what you mean when you say Strawberry Shortcake: a rich, lightly sweetened, somewhat dense but tender cookie/biscuit thing with gobs of strawberries with some type of cream thing, usually either iced or whipped, if not both.

Masala Spices

Mix 1/2 teaspoon each of:
cumin
coriander
nutmeg
black pepper
cinnamon

and 1/4 teaspoon each of:
cardamom
cloves
star anise or anise seed


Cream Cakes

2 teaspoons masala spice mix
2 1/2 cups flour
1/2 cup cornmeal
2 1/2 tsp baking powder
2/3 cup sugar
1/2 tsp salt
zest of 1 lemon
1 1/2 cups heavy cream

Pre-heat oven to 350.

Melt about 2 tablespoons of butter in a small bowl, and put about a half cup of sugar in another. Set those aside.

In a small dry saucepan, toast the spices for a minute or two at medium-low heat. They will smoke a bit, but you don't want them to do more than change color very slightly. Dump them into a large mixing bowl and shake them around to stop the cooking, or they will get burnt.

Sift all the dry ingredients together into the mixing bowl. Gently stir in the cream, then knead lightly just until the dough comes together in a ball.  Divide the dough into 12 balls. Dip the top of each ball into the butter, then the sugar. Put the balls on a cookie sheet sugar side up. Bake for 25-30 minutes.

Cool the cakes, then serve with your favorite decorations.


  Notes:

1.The original recipe (from Rustic Fruit Desserts) said to divide the dough into 8 pieces. I think making them smaller would be better. You can always eat 2 small cakes if you want them, but it is somehow much less satisfying to eat part of a larger cake, even if that is all you want.

2. Next time, I might make these in cupcake tins, with cupcake papers and stuff. Besides looking cute, it would keep the cakes more ball shaped. This would allow me to cook the outsides a little crunchier without drying out the insides too much.

3. I might also use a coarser sugar. More texture than regular old table sugar.

4. You have to use salted butter on the outsides! Otherwise they will just be bland.

5. The measurements given for the spice mix assume that the spices are already ground when you measure them. Spices bought ground up are fine, but I like to do my own. Nutmeg in particular is much  more flavorful if it's freshly ground.

These remind me of gingerbread, but are just slightly more exotic. Garam Masala is used in meat dishes usually, but it is largely composed of things western cooking uses for sweets, with the addition of black pepper and coriander which gives gives the flavor a hotter, earthier punch. I would eat these cakes with any berries, or poached pears or apples, or grilled peaches with walnuts and mascapone, or fresh figs, or greek yogurt, or nothing at all. It's all about the crunchy top. That part is really good.

Wednesday, June 13, 2012

Skunk Works


I said I'd bring an experimental cake to family dinner. Pete said "skunk works dessert is fine by me." It had a familiar sound to it, but I still had to look it up, and then I was all tickled by the idea of Skunk Works Cake. No advanced physics knowledge is required, but the original recipe did ask for a pound of quark.

Skunk Works Lemon Yogurt Cake

1 1/2 cup all purpose flour
1 tsp baking powder
1 tsp lemon zest, minced
2 T sugar
7 T butter
pinch of salt
1 egg, beaten

Cut the butter into the dry ingredients until it looks like aquarium gravel. Beat the egg well, and gently toss it in with the dry mix, then fold it all together until it forms a cohesive mass. Flatten it into a pancake about an inch thick, wrap it in wax paper and refrigerate it until you do the other parts.

3 egg yolks
3/4 cup sugar
1 teaspoon vanilla
7 T butter (yes! again!), softened
6 oz heavy cream
17 oz (500g) greek style yogurt
1 tsp lemon zest, 
1 1/2 T cornstarch
pinch of salt
3 egg whites

You need a springform pan for this.

Pre-heat the oven to 325

Whisk the yolks, vanilla, and sugar together until they become light colored and creamy looking. Whisk in the butter, then the cream. Mix in the yogurt, salt, cornstarch and lemon zest.

Roll out the crust, and lay it in the pan. Try to make sure the pastry goes all the way down into the corner where the sides meet the bottom.

Whisk the egg whites until they form stiff peaks, then fold them into the batter. Fill the shell and bake for around an hour and a half.

Serve cool. Eat with strawberries, and your favorite people.

Notes:

1. I don't have an electric mixer. I do have an excellent wire whisk, which does a good job on all that fluffing that is necessary for good cake. I also now have a sore triceps. And a sore thing-that-attaches-your-scapula-to-your-ribs-in-the-back.
2. When rolling out that crust, don't worry if it splits into crazy shapes. Just get it evenly flat, then piece it back together in the pan.
3. My oven. Oh my stupid oven. I have no idea if the cooking time I've stated will be correct for you. Start by baking it for an hour, and if the batter still looks quite pale and has not poofed up at all in the middle of the pan, check back in 15 minute intervals. It's done when it has fully inflated and is looking just slightly darkened.
4. When you put it in the crust, the batter will only fill about about 2/3 of the pan. This is fine, the egg whites make it like a souffle; it will expand a lot.
5. Which means that you should make sure that the crust comes up all the way to the top of the pan.

So, it's basically just a cheesecake, right? Yup. I guess in Germany they make a very thick, over-condensed version of yogurt and call it quark. After reading about quark, I figured that I could use that batch of yogurt that I let get too strong in this recipe. 'Quarkkuchen' sounds like a pretty cool thing to eat, huh? But other than as a means of using up unsatisfactory yogurt, is it worth doing again? Yes indeedy.

I love the texture of baked cheesecake, but they are awfully rich. I like the relative lightness of no-bake cheesecake, but the texture is a bit gloppy and the high concentration of lemon juice usually used to set them makes the flavor pretty unsubtle. I wanted something in between, and I think this fits the bill. It seems to be related to the fallen souffle cake I made a long time ago, in that the inflation during cooking is not a feature to be desired in itself so much as it is a way to know if the thing is done or not- this cake deflates rapidly when it's out of the oven. The texture is very light, almost delicate, even when it has gotten completely cold. The lemony flavor is brought out by the tartness of the yogurt, but unlike in a no-bake cake, the lemon doesn't overpower everything else.

This recipe is the perfect size for dessert at family dinner, with a small slice leftover for me to eat for breakfast.

Saturday, September 17, 2011

Lemon Dilemma


Because I am a single gal, I usually don't use a whole lemon before it gets all wizened into a rock. I solved that problem by keeping lemon wedges in the freezer, but one consequence of freezing lemons is that when you thaw them out, the lemon oil in the rind tends to make your food bitter.

The lemon zest is where most of the oil in the rind is- which is a good thing if you want a pinch of it minced up to flavor something with. Not so good when you microwave a frozen lemon and you can't control how much peel flavor goes into your lemon juice. I decided that was something I could live with if it meant that I could have fresh tasting lemon juice without wasting most of a lemon, until I read somewhere that you can preserve lemon zest in salt or sugar. Hmmmm. If I zipped all the outsides of my lemons off before freezing them, I would have solved the bitter-lemon problem, as well as saved the good parts of the rind for something else, right? So the last time I bought half a dozen lemons, I saved the zest in a pint jar of sugar.

Well, now I have 2 cups of lemon sugar to use up. No big deal, but who on earth actually uses as much lemon zest as that? Next time, I think I'll just freeze some of it separately and make myself throw the rest away, like a sensible person. Meanwhile, here are some lemon bars.

2 cups all-purpose flour
1/2 cup powdered sugar
3/4 cup butter -I use salted. If you don't, then add 1/4 tsp salt to the crust.

5 eggs
3/4 cup lemon juice
1 1/2 cups sugar- I used 1 cup plain, 1/2 cup lemon sugar.
1 tsp baking powder
1/4 cup flour
1/4 tsp salt

Pre-heat the oven to 350. Line the bottom of a 9x13 pan with waxed or parchment paper.

Cut the first 3 ingredients together with a pastry tool. Unlike normal pastry, you don't want to leave butter lumps in the dough. It's done when it looks almost moist, but still crumbles easily. Dump the crumbs into the pan, distribute them evenly over the bottom, and then press them down firmly into a nice solid crust. Prick the crust all over with a fork to prevent it from bubbling up in the oven, and bake it for about 13 minutes. It should be barely browned around the edges by that time. Remove the crust from the oven, and turn the heat up to 375.

Beat all the rest of the ingredients together until completely combined. Pour over the crust, and bake for 15-20 minutes, or until the filling has set. When they are cool, sprinkle the tops with powdered sugar and cut them up. 

Notes:

1. While the bars are still hot, take a very sharp, thin, knife and run it around the edge of the pan to separate the bars from the baking dish. On a related note,

2. Don't be tempted to use a non-stick pan. Even if the bars don't stick to the sides of the pan, you still have to cut them up, which will just gouge holes in your teflon. I am against teflon anyway.

3. You really do have to wait until they are cool to put the powdered sugar on top. If they are still warm, the steam coming off the bars will just make the sugar dissolve. I think Harriet did that once. They still tasted fine, but they didn't look the same and the tops were pretty sticky.

4. The amount of time the filling will take to set up depends on how cold your ingredients are. I use eggs right out of the fridge, so they take on the long side to cook.

5. Oil the knife you use to cut them with. This part isn't mandatory, but it makes them come out prettier, because they stick to the blade less.

This is a pretty good formula. It makes a good sized batch, with a nice proportion of lemon stuff to crust. I looked up a bunch of recipes before I made these, and I think I incorporated the main features that attracted me to each. I used less total sugar than most recipes called for, and more lemon juice. I added an egg to compensate for the extra juice, which had the added benefit of increasing the total volume of lemon goop to slightly greater than 50% of the finished confection. There is just enough flour in the filling to give it some stability, and the baking powder adds a bit of fluff.

The powdered sugar in the crust is indispensable for creating the texture which is such a key part of the lemon bar mystique. Granulated sugar tends to make a tougher pastry, both because the larger particle size makes the sugar distribute differently in the dough, and because powdered sugar has quite a bit of cornstarch in it as an anti-caking agent. I'm pretty sure that it's mostly the cornstarch which makes the crust both tender and dense, as a lot of shortbread recipes call for it. Incidentally, if you measure ingredients by weight, this takes about 65 grams of powdered sugar in the crust.

Monday, July 4, 2011

Albino Jello


Also known as panna cotta, for those who want to be fancy. It's surprisingly tasty, if you like "desserts that quiver", at any rate. I'm chinese, so that comes naturally to me.

1 quart half & half
1 cup heavy cream
1 cup water
1/3 cup sugar
2 teaspoons vanilla
1 and a half  to 2 packets of knox gelatin granules.
berries to serve with

Put the water in a small sauce pan and sprinkle in the gelatin. Stir it up and let it soak for about 10 minutes. Add the sugar and vanilla, and gently heat the mixture until the solids are completely dissolved, but do not boil it. Put the cream and half & half in a large bowl and stir in the sugar mix. You can either refrigerate the whole thing, or divide it into single servings, and chill it for at least 8 hours. Eat it with fresh berries. Real no brainer, huh?

If you want to put it in a fancy mold and have it keep its shape when you turn it out, go for the full 2 packets, or a little more, and chill it for 24 hours- gelatin takes that long to reach maximum setting power. I like it best when the texture is just firm enough to bounce in a spoon, and to serve it pleasantly cool rather than plumb cold. Vanilla is a subtle flavor and the smell/taste particles are more abundant closer to room temperature.

Sometimes I wonder why I like this stuff so much. It's very weird crap. It's got the taste and richness of vanilla ice cream, but has the texture of jello and it won't give you brain freeze.

This seems to be related to a number of milk-based desserts. If you were to add eggs, its ingredients would be almost identical to flan, creme brulee, and pastry cream. Taken as it is, anyone who has gone to church socials and family reunions in the midwest recognizes it as the plain white layer in a striped jello. If you've ever eaten that almond flavored dessert at a chinese restaurant then you've met its asian cousin, and yet, it seems to be very different from any of those things. The eggs in creme brulee, flan, and pastry cream result in a much heavier texture than panna cotta. The stripey jello version, with the cream sandwiched between layers of neon, looks like a chunk of lucite novelty jewelry from the sixties, and taste the way a product of the space age ought to: compellingly artificial. The chinese version in its best iterations is very light, not rich at all, and the almond flavor seems give it an almost palate cleansing effect. (At its worst, almond curd is a rubbery, watery, kludge of canned fruit cocktail and vaguely eau-de-toilette flavored agar bits.)

The texture is key, I think. Heat alters both the texture and flavor of the cream in cooked desserts, and agar, which is the traditional setting agent in almond curd, has a unique set of properties as well as a distinct, if subtle flavor. Gelatin gives panna cotta a delicate, silky quality which contrasts with the intensely rich flavor. There must be some happy alchemy between cow-products.

Sunday, January 2, 2011

Chocolate Hazelnut Macaroon Cobbler


This is one of the least photogenic foods I have ever made, which is unfortunate because it is also one of the most sumptuously decadent things I can remember having eaten. I got the idea from a recipe I saw online for a chocolate peanut butter thing. I think the original has about 3 too many things going on at once. 2 kinds of chocolate, peanut butter, coffee, cinnamon... So I pared it down a little. Also, the original recipe makes a zillion of these guys, and even a half recipe is more than I know what to do with. Alas. Here's my version:

for the topping:

1 scant cup packed brown sugar
2 oz semi-sweet chocolate, chopped pretty small
1/4 cup unsweetened cocoa powder

for the dough:

1 1/4 cups AP flour
3/4 cup sugar
1/2 teaspoon salt
3/4 teaspoon baking powder
about 1/2 cup half & half
1 tablespoon melted butter
1 teaspoon vanilla

for the pans:

about 6 oz semisweet chocolate, broken or chopped up
about 3/4 cup hazelnut butter
about 1 to 1 1/2 cups half & half

I recommend using 8, 4 or 6-oz ramekins or oven safe teacups to cook these in. The original instructions say to use 8-oz ramekins, and I think that makes them larger than one person can reasonably eat. Not saying that I don't want to, but...sigh. Go for half-cup size servings. You can always have another if one is not enough. Also, teacups would make them look fancier.

Preheat the oven to 350.

Oil the baking dishes and set them on a cookie sheet, because the contents will overflow a bit.

Combine the topping ingredients in a small bowl and set aside.

Put about 1 oz broken chocolate and a generous tablespoon of hazelnut butter in each baking dish.

In a mixing bowl, sift the dry ingredients for the dough together. Add the liquid ingredients and mix the dough quickly until all the dry ingredients are fully incorporated. It should make a very stiff dough, about twice as thick as cake batter. Spoon even portions into each ramekin. Don't worry about pushing the dough down too much or covering the pan evenly. It's actually better if the dough has holes in it and sticks up a bit. Divide the topping over the cobblers, and add enough half & half to each one to fill the dish to within about 1/4 inch from the top.

The original recipe said to cook them for 45 minutes, but if you make them smaller like this, 30 minutes should be sufficient. They should still be a little bubbly around the edges when they're done. Let them cool for a bit before you serve them with some ice cream.

Notes-

I used these things from Trader Joe's called semi-sweet callets. They come in little ziploc baggies and very helpfully have a thing on the label that says "6 disks = 1oz". I put about 5 or 6 broken ones in the bottom of each 8 oz dish, you may have to adjust the quantity if you use smaller ramekins.

I also made my own hazelnut butter, because I couldn't find any at the store, and in any case, I suspect that if I had, it would have cost an arm and a leg to buy more than I could use. So I got a little baggie of toasted, unsalted hazelnuts from the nut man at the farmer's market, and put them in the mini-prep. Use the grind setting and process them until they achieve the texture you want. You'll probably have to stir it up a few times, and add a touch of salt. I made mine weeks ago, around the time of the spinach apple salad, and kept the hazelnut butter in the fridge.

Friday, December 31, 2010

Ba Bao Fan


The name of this dessert was baffling to me when I was little. In a typically oriental piece of transliteration, dad used to call it "eight precious pudding". I thought he was saying "a precious pudding", which made more sense than ba bao fan. I mean, I got that the 'fan' part meant rice, but the rest- bobble fan?- ba bowl fan? Huh. Beat the hell out of me. I think I was in high school when I finally figured out that the name means something like '8 things in rice'. There's some kind on chinese numerology business going on here. 8 is an auspicious number, so I think the implication is that if you have eight things in the rice, that must make it fancy. If you look up recipes online, a lot of them will call it Eight Treasures Pudding. 

But never mind! It is delicious, and takes virtually no effort to make, especially if you buy the sweet bean filling in a can. Here's what you need:

3 cups sushi rice. It will say 'short grain sweet rice' if you aren't in the habit of buying it.
2 or 3 tablespoons canola oil, or lard of you're feeling particularly authentic. Duck fat would be even fancier!

1 1/2 cans sweet bean filling- there were 2 kinds at the store, and I recommend the one in the green & yellow can. The one in the blue package isn't as good, which I might have known at the outset. The sketchy outdated label design on the L&W brand made me suspect that the contents would be more authentic in much the same way that having a frightening washroom in a chinese restaurant augurs well for the quality of the food. It's a cultural thing.


toasted, unsalted cashew nuts
ginko nuts
candied orange peel or pieces of candied orange
dates- regular, or chinese red ones if you can find them.
prunes
golden raisins
maraschino cherries!

This will make enough for 13 adults and 5 children ages 4-7ish.

The only ingredients that are really critical are the rice and the sweet bean filling. The important thing is that you end up with 8 fruits, nuts, etc to decorate the rice with. Maraschino cherries had a decidedly exotic and luxurious mystique to me as a child, and they remain my favorite no matter how horrible I know they are. Other traditional things are lotus seeds, chinese red dates, dried apricots, and maybe dried pineapple or candied chinese plums. I also used a few blanched almonds, but that was because I was really leery of the ginko nuts. See note below.

Rinse the rice 3 or 4 times, until most of the excess starch has been washed off. You could skip this step, if you wanted, but the rice is much easier to handle later if it's been well rinsed. Drain the rice, put it in a rice cooker with 4 cups of water, and cook as usual. When the rice is done, gently toss the oil or fat into the rice with a fork. Let the rice cool a bit while you assemble the rest of the stuff.

You will need a large metal or glass mixing bowl for a mold. Round is traditional, but there is nothing I can think of that should stop you from using a ring mold, a loaf pan, or any other fancy shape you like. The limiting factor is the fact that you have to steam the mold for an hour or two, so whatever you use has got to fit inside another, larger, pot with a lid. I had to borrow my brother-in-law's 5 gallon pressure cooker for this one.


Oil the mold. Arrange the rest of the ingredients in fancy designs in the bowl. Cover them with a layer of rice. I scooped up handfuls and patted it into flat pieces then laid them on top of the decorations. Keep your hands wet while handling the rice, it will stick to you less. Scoop the bean filling into the middle, smooth it out, and cover it with a layer of rice. Gently press the whole thing down and cover it with foil.


I don't have 3 arms. My niece Agatha was helping me with the almonds.

If you mean to eat it more or less immediately, steam it for about an hour- all it needs is to be hot through. If you're making it ahead of time, like I did, refrigerate it until about 2 hours before you want to eat it, then steam it for about 1 1/2 -1 3/4 hours. That much mass will take a while to warm up. About 15 minutes before serving, remove it from the steamer and run a knife around the edge to loosen it up, then invert it onto a serving dish. If it doesn't immediately fall onto the plate, just go away and leave it alone for a few minutes. Presently, the steam trapped in the mold will un-stick the rice, and it will come out. Pick off any little bits of decorations that are still in the mold, and put them back on the pudding. Serve with a little honey drizzled over each person's portion.

Note: Ginko nuts (or seeds) can be found in little vacuum packs in the refrigerated produce section of Fubonn. To prepare them, mix 1/4 cup sugar with 1/4 cup water in a small sauce pan and simmer until the sugar has dissolved. Put in the seeds and simmer them for about half an hour befor using them. They are very strange. They are slightly astringent tasting, sort of like pine nuts, and once cooked in the syrup, they have a texture like gumdrops.

Ginko nuts figure largely in the early lore of my family. Some time while I was in grade school, Dad took Pete to help gather ginko nuts. If you've ever walked under a ginko tree in the fall, you will have noticed that fallen ginko fruits smell like poo. That's because, like actual excrement (and body odor, and rancid butter), ginko fruit contains butyric acid, which is known as one of the stinkiest chemicals in the world. So of course, chinese people love to eat ginko nuts. They are even slightly poisonous! Besides, why would anybody be put off by the idea of coming home smelling like a pigsty, leaving your (only) pair of sneakers and the inside of the car scented like a cesspool from the contents of a 5 gallon bucket of decaying fruit? All you have to do is wash the foul-smelling glop off the outside of the seeds... which involves plunging your arm into the bucket and sloshing them around.

No, thank you. I will buy little vacuum packs in the grocery store.

Saturday, October 30, 2010

Oe. Hangover.


I am such a pantywaist. 2 glasses of wine and I was completely done in. Not like oh dear, regrettable, I mean, I was at my own house already, but I fell asleep extra early and woke up thinking I needed comfy breakfast in my bathrobe. Homemade pear crisp & yogurt, plus an egg Sara brought over which was laid my an honest-to-gosh chicken. Like, one she knows, not like a distant anonymous hen.

Crisp

4 pears, ripe but still pretty hard, different varieties if you have 'em. I had a bosc, a couple green bartletts, and an anjou which was still hard as a rock.

3/4 cup flour
3/4 cup rolled oats
2/3 cup dark brown sugar
1 stick butter
pinch of salt
1/2 teaspoon punkin pie spice

Cut the pears into 1/2 inch chunks. I didn't peel 'em. Put them in a 9x9" pan. Bash all the dry ingredients together until they are mostly combined but still have some visible butter lumps. It helps if the butter is still a little cold. Spoon the topping over the pears. I refrigerated mine over night at this point, which made it take a very long time to cook- something over an hour at 375. In retrospect I would either not refrigerate it, or I'd just put it in at 400 and call it good. Also, I'd use about 6 pears, or only about 2/3 as much topping. Probably more pears, they loose a lot of volume. It was very good last night with vanilla ice cream, and it responded well to nuking it for breakfast this morning.

Thursday, April 1, 2010

I'm Martha Stewart, Bitch!


...but really, I did use a recipe out of her pie book. It even looks like it worked. It seems to have worked so well that I'm still suspicious. I don't even know why I fixated on this recipe, maybe because to me, it looked like an impossible pie. I'd used the crust recipe before, here it is:

2 1/2 cups all purpose flour
2 sticks butter
3 T sugar
2 egg yolks
1/2 tsp salt
4 T very cold water

Cut the flour, sugar, salt and sugar together until the biggest butter globs are about the size of rice grains. I mix the water with the egg yolks before adding it to the flour, but it's not crucial. Don't over-work the wet dough! Just smash it together enough to get it all evenly combined. There's enough butter in it to make it act just like play-doh. This makes enough pastry for a 2-crusted 11 inch pie. I only have an 8 inch pan, so I've got some extra. You can make the dough ahead of time and chill it until you need to use it, if you want.

Ok, well and good. But the filling sounded too simple to be true. It goes like this:

2 lemons
1 1/2 cups sugar
4 eggs and 1 egg white

Cut one lemon into paper thin slices, rind and all. Cut the rind and pith off the other lemon, and slice it as thin as you can. Toss the lemons with the sugar and cover, leave it in the fridge for about 24 hours. The next day, preheat the oven to 450. Roll out your crust, beat the eggs and mix them with the lemons & sugar, and pour it into the pie shell.  Weird, huh? There's no fat or starch in the filling, it's all about the eggs.

I can't say I had high hopes about this. I was sure the filling would do something awful. But it seems to have set up, unlike many other pies I have attempted in the past. I will say though, that you need to use a mandoline to prep the lemon with the rind on it. Don't try to make pretty slices, nobody will see it anyway. The idea is for the long period of soaking in their own juice to de-bitter the rinds. A good sharp knife is fine for the other lemon.

Top it with another round of crust. I cut the slashes in the crust before putting it on the pie, the filling is totally liquid so if you want decorative cuts you gotta do it first. Bake at 450 for 15 minutes, turn down the heat to 375 and cook for another half hour. I lay a sheet of tinfoil over mine after the first 15 min because this crust recipe tends to get burn-y faster than crusts without added sugar.


It's like a big lemon bar, with a little texture. Next time, I'm gonna add some herbs. I bet lavender flowers, or rosemary, or mint would be pretty good.  Maybe even oregano.

Monday, March 8, 2010

'Stolen' Apple Pancakes

Which is what the handwritten recipe in my mom's recipe notebook says.

I associate a childhood trip to chicago with this recipe. There was a pancake restaurant. I think I was in first grade, and I did not appreciate it. I have never been a good traveler, nor a person who enjoys meeting strangers. Going to Chicago was something I wanted to do not because I actually enjoyed the experience, but because like all children, I didn't want to miss out on anything that might be fun. How was I to know at that age that I was destined to be a curmudgeon? I was six.

The pancake restaurant was noisy, crowded, I was at a table with many strangers, and I don't remember what I ordered. Waffles, maybe. With strawberries, because we never had such exotic things at home, but I don't think they lived up to the expectations I had of them. Somebody else ordered the apple pancakes. I don't know if that was when dad first had them or what, but evidently they made a great impression on him, because this recipe showed up in mom's cookbook. 'Stolen' I assume because dad had to approximate the originals on his own.

On the other hand, while thinking about this recipe brings up memories of some very uncomfortable family excursions, the pancakes themselves, and the making of them, impart a feeling of great wellbeing. Even, I hate to admit it, of nostalgia! This was a special occasion breakfast to begin with, and later on, Dad would just decide that he wanted apple pancakes from time to time. Sometimes the tai chi group would come over, Dad would make a bunch of these things, and the house would smell like hot cooking oil and sugar all day.

The pictures are not that great, but I plead ravenous impatience to eat breakfast.

1 large apple, 2 would have been better
1 or 2 T cooking oil, canola or like that, not olive.
a teensy pinch of salt

a generous handful of brown sugar
punkin pie spice or cinnamon, if you like

I have no idea what the pancake recipe was on that card. I know that it used only white flour. It had a bunch of eggs in it. I was feeling lazy, and just used pancake mix: TJ's multigrain. It makes a fluffier, lighter dough than the ones Dad made, but I like things to be less heavy than he did. Also, do not attempt to make this in a flimsy pan or one with a non-stick coating.

1 1/2 c pancake mix
1 egg
1 cup water
a dab of oil

Pre-heat the oven to 475.

Peel and slice the apple into 1/4 inch pieces or so. Get the oil pretty hot in a well seasoned all metal skillet and throw in the apples and a sprinkle of salt. The salt is very important, it makes the apples sweat, and keeps them from being one dimensionally sweet. When the apples are a teensy bit brown, turn them once and sprinkle the brown sugar and spice over them. The sugar will begin to caramelize very rapidly.

Mix up the batter ingredients up really fast, and don't worry about a few lumps. You will actually only need to use about 2/3 of the batter. Pour the batter over the apples and cover for a few seconds. When the caramel begins to ooze up around the edges and through any little holes, remove the cover and put the skillet in the oven to finish cooking.

When the pancake is just barely done and is starting to brown at the edges, take it out, cover it and let it sit for about 3 minutes. This lets the pancake finish cooking, and allows the apples to steam loose from the pan a bit. Turn the pancake out onto a plate and poke any apple bits back into it that have got stuck in the pan. Eat with scrambled eggs and cheddar cheese.

Definitely, this is for eating with company. It will taste just as delicious by yourself, but it would be a terrible pity to have nobody to enjoy it with.

Tuesday, February 16, 2010

And Happy Mardi Gras!


Cake.

I've had discussions with several people, on totally unrelated occasions about the particular magic of the word 'cake'.  I agree. Cake is a good word. It implies so many wonderful things that when somebody says "Oh, it'll be cake" they mean it'll be too good to be true, possibly better than you deserve, and in any case, there will be lots of fun and goodness to be had.

It also means something is easy, which cake isn't, always, except for the eating part. But with the aid of modern technology, cake is really not that daunting an achievement. And damn, sometimes I do miss celebrating mardi gas.

King Cake

For the dough:

1/2 cup water
15g dry milk
10g instant yeast
about 4 1/2 cups flour- I used all purpose, but I wonder now if I should have used bread flour.
1/2 cup sugar
1/2 tsp punkin pie spice
10g salt- this is about a scant teaspoon
1 tsp vanilla
3 whole eggs
4 egg yolks
1 stick of butter

the filling:
about a cup each of lightly toasted pecans and whole dried dates, 1/2 cup brown sugar and 1/4 cup oatmeal. Chop everything in a food processor. The oatmeal is really just to keep the dates from turning into paste. It should be slightly chunky.

I put the dough ingredients in my bread machine. I had to add quite a bit of flour when it started kneading; I think I measured the flour wrong to begin with... But don't worry! It'll be fine. This dough should be about 25% softer than a dough you make regular bread with. You may think that it will be too sticky to work with, but there is so much butter in the recipe that it really isn't a problem.

I just let the dough machine do its thing, and when it beeped to tell me the first rising was done, (that's about an hour) I floured my counter, turned the dough out onto it, and rolled it out into a rectangle about 15x24 inches. Then I took the filling and pressed it firmly into the dough, right up to the very edges. It's ok if some falls out the sides, but you probably don't want any unadorned patches in your cake. You can eat the bits that fell out while you wait for the thing to rise.

Roll the dough up along the long axis of the rectangle. As you roll, flour it a bit so it doesn't stick back down on the counter. The middle of the roll will probably be rather thicker than the ends, so gently stretch the dough out. You need your cake roll to be at least 2 feet long. Have a greased sheet pan ready, as well as a small oven-safe dish, also oiled. Put the little dish on the sheet pan and wrap the cake roll around it. This will keep the ring shape from closing back up. Tuck the ends in and let it rise for about another hour.


The recipe this is based on said to bake it with the little dish in place to keep the ring shape, but upon reflection, I decided to take the thing out before baking. I also slashed it and gave it a bit of an egg wash, which I'm very glad I did because it made it so pretty I was literally taken aback.

Bake at 375. Mine took almost an hour. If you can make yourself refrain from flapping the oven door open the way I do, it will take less time, but you should cover the cake with a sheet of foil once it's nicely browned or it will get burnt. I'm pretty happy with how it tuned out, but I think I overcooked it. Other notes: I read a recipe for boiled frosting, which tastes good, but just slid off the cake. Just do the thing where you mix a couple tablespoons of lemon juice with an enormous quantity of powdered sugar and it'll do better. This dough seems to be a nice all-purpose brioche. I bet it would make a great french toast loaf. And the filling is not traditional. Almond paste may be what is supposed to go in it, but I liked this an awful lot. Fill it, or not, with whatever you like.

Saturday, February 13, 2010

Yappy Hoo Near!

Wikipedia has an entry about Tang-Yuan that seems to pretty much line up with what I remember about them.

Last year I made some of these with mochi flour and a rather poor approximation of mung bean filling. This year, I got a bug in my ear and decided to go from scratch. And I managed to remember that when I was very small and was eating them for probably the first or second time, the ones with plum filling were my favorite. The ingredients are simple, the procedure is not complicated, but it is time consuming and labor-intensive in parts. Do not  attempt the filling recipe unless you are willing to literally stir constantly for about 40 minutes. Your arm will get tired.

Here's what you need:

2 or 3 cups sushi rice, in a large pot big enough to fit that plus about 5 cups of water.
a blender, a large colander and a piece of muslin big enough to line it with.

3/4 lb of prunes
2/3 cup cooking oil or shortening. Saturated fats will make the finished produce easier to work with.Lard is traditional, dad used duck fat when he had it.  Chicken, maybe not.
possibly a half cup of sugar, but I didn't this time, I wanted it to be a little tart.

a very heavy 2 qt cooking pot, and NOT a non-stick one.
This recipe will make enough for a whole party of squeamish people, or for a small number of afficionadoes. They are even more weird and ethnic than mochi.

Leave the rice in the water for up to a week, and at least 3 days. Unless you want to risk having it ferment, stow it in the fridge. The rice grains will absorb water to the point where they start to disintegrate. Pinch one in your fingers and you'll see. It'll crush into a coarse mush. Then line your colander with the muslin, and put the rice through the blender, using only as much water as needed to keep it liquid enough for the blender to cope with it. This will take a while. Get it as finely ground as possible, and pour it into the muslin lined colander. Tie up the cloth and let the liquid drain out (this is likely to take at least 24 hours, so put it back in the fridge), and the mass of rice paste is your dough. You should freeze it if you aren't going to use it within a couple days. I found that after draining, freezing and thawing once, it was still coarser than I wanted, so I put a glob of it back in the mini-process and ground it again, with very good results. I suspect that the freezing helps break down the grains.

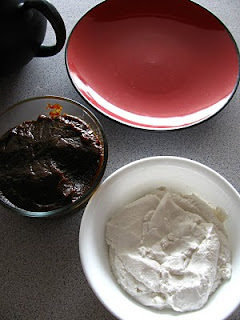
For the filling, put the prunes in the heavy pan with enough water to cover them, and bring them to a boil. After about 8 or 10 minutes, they should be tender enough to put in the blender, again using as little water as possible. Return the pureed prunes to the pan and add the oil and the sugar if you want it. From now on, be prepared to stir. With the heat at medium, use a wooden spoon to methodically scrape the bottom of the pot. The correct temperature for cooking will make the puree sizzle gently but quickly as you expose the bottom of the pan when stirring. You are going to cook all the water back out of the prunes which you just put in. After about half an hour of stirring, the paste will begin to form a coherent mass, and some of the oil will begin to sweat back out of it. It's done when it is very dark and has a consistency about halfway between Jif and Play-Doh. Turn off the heat and keep stirring until the paste stops sizzling against the pan, then refrigerate it in tupperware until you want to use it.

You know, lots of fruits can be treated this way. Dad used pineapple one year, which was good, and once, there was a batch made out of dried chinese red plums. That didn't go over so well, it was full of tough, splintery fibers. It tasted good, but the texture was decidedly sinister. Very pokey. Good lord, that must have been in like, 1979 or something. Don't feed things like that to your kids, they'll never forget. Anyhoo, the thing is, after all that cooking, anything you use will have a tendency to taste similar. It's the caramelization.

What to do with it:

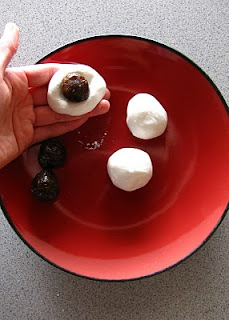
Take the rice dough, pinch off pieces about 2 tablespoon sized, and roll them onto balls. If the dough was drained long enough to make it too dry, just add a little water back into  it. Make little balls out of the filling, about 1 teaspoon sized. Hold one of the dough balls in your palm and poke a hole in it about down to the middle, and push one of the filling bits into the hole. Gently roll the dough in your palms to re-form it into a solid ball with no filling showing. The whole business should end up about the size of a ping-pong ball. Continue until you have as many as you want.


Bring a large pot of water to a boil and drop the tang-yuan into it. Stir them once so they don't stick to the bottom. Wait for the water to boil again. Once the water boils, turn it down to a simmer. When the tang-yuan are done, they will float to the surface. As the rice starches expand, they become more buoyant. The side that is immersed in the hot water will eventually become so much less dense than the top that they will flip themselves over if you poke them gently. Don't cook them any longer than that, the dough will just disintegrate.

Traditionally, these are served in a generous amount of the cooking water. I think that just makes them watery-tasting, so I usually don't do that. However, I have to admit that cooking them from scratch makes the cooking water actually pretty appealing. The freshness of the rice flour is orders of magnitude more delicious than frozen store-bought, and the texture is both firm and tender. You would think something made out of just rice would be boring, but that doesn't have to be so. Rice should taste like rice, and things made out of it should be yummy.


Lastly, I used olive oil in my filling. It's ok, but I don't really recommend it. The oil oxidizes or something in the cooking, and even if you use the most boring kind, the taste becomes more pronounced at the end. Like I said, ok, but definitely not traditional. Use peanut or canola or corn oil if you can't bear to use lard.


Wednesday, January 13, 2010

Cat Bars

They contain no cats. Nor are they for consumption by cats; neither are they cat-shaped. Merely, this recipe was posted to me by Cat. Thanks Cat. They are scrumptious.

crust:
1 cup quick oats
1 cup flour
1/2 cup butter
2/3 cup brown sugar
1/4 tsp baking soda

filling:
1/2 cup chopped dried apricots
1/2 cup dried tart cherries
3/4 cup water
1/4 cup sugar
1 T flour


To cook filling: bring the first 3 filling ingredients to a boil, then simmer for about 5 minutes. You will need to add a little more water from time to time, the fruit soaks it up a lot. Mix the flour & sugar together, dump them in the fruit and simmer until the filling is thickened and you can no longer taste the raw flour.

Get out your trusty pastry cutter and bash all the crust ingredients together rather coarsely. Press half into a 9x9 baking pan, spread filling over it, top with remaining crust, bake at 350 for about 30-40 minutes. Cool before cutting, they are crumbly. Of course, if you was to use a spoon and eat them out of the pan, I wouldn't rat on you.

I did make a couple changes to Cats recipe, now I think onit. I added a dash of lemon to the filling for more tartness, and a pinch of salt and a pinch of punkin pie spice to the crust, and because I can't possibly leave well enough alone, I chopped about a quarter of the filling in my mini-prep after it was cooked to change the texture. And I think my brown sugar was too dry. I should have added a couple drops of water to the crust to compensate.

Tuesday, October 27, 2009

Cookie Lesson


Two lessons, in fact.

1: It pays to follow directions
2: It pays to improvise

I had a jones for chocolate cookies. I got me a goodlookin recipe:

2 cups confectioner's sugar 
3/4 cups dutch process cocoa
3 1/4 cups all purpose flour
1/2 tsp salt
1 1/2 cups butter (!)
1 tsp vanilla
2 eggs

Sift all the dry ingredients together into a large bowl. Cut in softened butter until evenly combined. A few little lumps are ok. Mix eggs & vanilla and add to dry ingredients. Mix until it forms a mostly smooth ball.

Bake cookies for 8 minutes at 350.


I followed it. Wow, huh? And then the dough turned out way too gooey for rolled cookies, which is what it was supposed to be. Well, I knew that might happen, the recipe reviews said it might, but what to do next? I didn't want to sit around waiting for it to harden up in the fridge, which was the suggested fix.

But I do have a totally neato vintage cookie press. Ha-HAH! It worked beautifully. Better than I had ever gotten the darn thing to work before, in fact.

So, who wants to have a tea party?

Saturday, June 6, 2009

"God I hope this works!" Shortcakes

So it is totally impossible for me to follow a recipe. I got a perfectly good recipe for biscuits online, because I didn't like the looks of any of the shortcake recipes, and besides, some of them called for stuff I don't have on hand.


These are my notes:

1 cup all-purpose flour

1 cup whole wheat flour

4 teaspoons baking powder

1 tablespoon sugar

3/4 teaspoon salt

1/4 cup butter or margarine

1 cup milk

In a medium bowl, combine flours, baking powder, sugar, and salt; mix well. Cut in butter until mixture resembles coarse crumbs. Stir in milk just until moistened. Turn out onto a lightly floured surface; knead gently 8 to 10 times. Roll to 3/4-in. thickness; cut with a 2-1/2-in. biscuit cutter and place on an ungreased baking sheet. Bake at 450 degrees F for 10 to 12 minutes or until lightly browned. Serve warm.


My plan:


2 cups flour= 260g
1 cup ww flour= 125g
5 tsp b.p.
4 T sugar
¾ tsp salt
½ c butter
1 c cream
½ c yogurt


god I hope this works.


bowl + butter = 390 g

several errors in plan: used 2 T bp rather than 5 tsp. Used bread flour not ap. Sigh.


Dude, I didn't even get the oven temp right- I set it at 400. Mercy.