Sunday, February 24, 2013

Adventurous eating


Natto is a thing I'd heard about, but I'd never seen it until I went to Uwajimaya in Beaverton last weekend. I thought it sounded like a pretty strange thing, and even though I like trying all sorts of strange things, I was a little scared of it.

It came in a 3 pack in the frozen section. I think the gist of the little cartoon is that you warm it up then stir it around with your chopsticks. The cartoon was baffling until I opened up the package. I thought for sure it was a picture of a large pot, indicating that the natto should be stirred into a pile of boiled eggs. Which made no sense at all when I looked up eating instructions online. Yes, I did need to look up instructions for how to eat this. Even so, that cartoon... Once I opened the package the meaning of the drawing became apparent. The orange blob is a little dab of seasoning, and the round things that I mistook for a bunch of boiled eggs are, in fact, the fermented soybeans.

If you've never eaten natto before, I have 2 recommendations:

1. Unless you enjoy slimy goopy foods, don't.
2.Wait until you are very hungry to try it.

I realize these are very ominous provisos, but really, don't get scared off yet. I mean, I ate it, and I'm still fine. In the first place, if you don't like slippery gooey foods, there's no point in trying this stuff. There ain't nothing slipperier nor gooey-er, except maybe a mudpuppy dipped in Elmer's glue. I don't inherently dislike slimy food, so that, per se, didn't creep me out. Why wait until you are extremely hungry to try it? Because it is so profoundly unlike any other thing I have ever eaten.

Here's what you do: You microwave the little packet until it's hot through. You realize that the room now smells powerfully like stale beer. As you stir the dab of sauce into the beans, and watch the gravy turn into a filamentous mass of glue strings that are persistent enough to suspend a couple beans several inches below your chopsticks, you think better of consuming them neat, as it were. So you stir them into rice, with some hot sauce and furikake, as recommended by some people online who are either actual Asians or are mocking Asian-English syntax errors. And then you aren't sure if you like it, or you are actually horrified but ravenously hungry. The beans are just beans, they are like smaller ones of the things you find in a can of Busch's baked beans. But instead of that ketchupy red sauce, there is this stuff that acts a lot like rubber cement and smells like flat beer, and whiffy french cheese, and maybe feet, or maybe something floral and herby. It isn't sweet, it isn't very salty. Sriracha and furikake really help jazz it up. Minced green onion is tradidional too, but I was out of those. What can I say? It made quite an impression on me.

They say that it takes about 10 tries to determine if you actually like or dislike a new food, because we are designed to be slightly averse to novelty. It's an evolutionary safety feature. Novelty = increased risk, taking increased risks = (in nature) increased risk of DEATH! Having a preference for familiar foods cuts down on the likelihood of eating something that will kill you.

But come on people! We live in the 21st century! Live a little! If a slimy soybean didn't kill all those Japanese folks, it isn't going to kill you. In fact, natto is comfort food to lots of Japanese. They eat it for breakfast, but I think I need to try it at other times of day several more times before I do that.

Monday, February 18, 2013

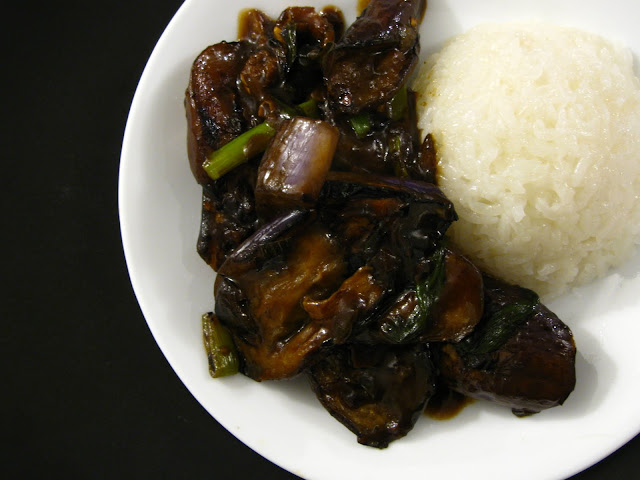
Chinese Eggplant


If I'd known this would be worth writing down, I'd have taken a picture of the eggplants I used before I cooked them. The thing is, I am not a photographer any more than I am a chef. The eggplants didn't look special, except in hindsight, and before I cooked them I wasn't sure what was going to happen, so I didn't know that a visual aid might be useful later. At any rate, here is this eggplant dish.

about 1 1/2 pounds chinese eggplant- the long skinny kind

1/2 cup of the chinese noodle sauce from this post
6 or 8 green onions
2 or 3 slices fresh ginger
some hot pepper flakes, to taste
cooking oil
salt

a tablespoon of cornstarch

Mix the cornstarch with 2 cups of water and set it aside.

Cut the eggplant into 1/2 inch slices. I cut mine diagonally because it looks more interesting. Cut the green onions into 2 inch pieces.

Heat a skillet with a couple tablespoons of oil on medium-high until the oil just starts to smoke. Sprinkle a pinch of salt in the pan and put in half the eggplant. Stir the slices to get a thin coating of oil on them, then poke them down onto the pan to sear. Periodically turn the slices so that each piece gets evenly browned. When the first batch is done, dump them in a dish and repeat with the second batch.

Put a little more oil in the pan along with the onion, ginger and red pepper flakes. Stir until the onions have gotten moderately brown, then put the all eggplant back in the pan to heat it through. Add the noodle sauce and the cornstarch and water. Cook until the sauce thickens and turns translucent.

Notes:

1. Warning!!! This dish requires powerful ventilation! In the first place because you have to sear the eggplant, which creates smoke to set off your alarms, and secondly because of the part toward the end where you throw red pepper flakes in the pan. Capsaisin must volatilize easily; frying peppers makes it very hard to breathe. Leave your doors and windows open!

2. The eggplant should be slightly charred in places.

3. Even if your pan is large enough to cook all the eggplant at once, I recommend against it. Having it all in the pan together will trap steam around the pieces and will make them soggy. Cook in 2 batches and the water evaporates of easily.

4. Take your time and pay attention to the searing eggplant, but move fast and slosh everything together once you add the liquid. Once the sauce thickens, remove it from heat immediately or it will burn.


This is a version of the stuff you can get in chinese restaurants. It gets called a bunch of different things- eggplant in tangy sauce, Hunan eggplant, eggplant in garlic sauce, eggplant in bean sauce. Usually they make it too sweet and too goopy. They almost never sear the eggplant, which is a pity, because in a restaurant it's much easier to do. You can crank the gas jets up under a giant wok and flail around with a spatula the size of a shovel and whatever you want to cook is seared in moments. A home stove doesn't put out as much heat as a commercial stove. Instead, you have to compensate by making sure that you have a very heavy skillet and get it well heated before putting in the eggplant. Even so, it takes longer.

I don't remember that dad ever cooked this dish. In fact, other than eggplant sandwiches, I don't remember him ever cooking eggplant except one time: we were in China together my sophomore year in college, hanging around in some dodgy qi gong school. They provided all of our meals, and mostly the food was passable, sometimes it was a bit horrid. Eventually, dad got fed up with it, and the thing that put him over the edge was a dish of eggplant. It was a generic mess of goopy brown and purple, and he said that it bore no resemblance to what it was 'supposed to' be. So the next day, we went to the market for eggplant, which I think was something that perturbed our hosts, because going shopping is chores, and guests aren't supposed to need do any work, right? The actual cooking part was fine, because once dad got into the kitchen and shooed the disappoving cook out into the back yard, he could do his showmanship thing. I didn't look. That kitchen was spooky even before dad started making things ignite in great alarming whooshes. I was more or less expecting the whooshes, but the cook and our hosts were not. There was some gesticulating, and some loud commentary, generally admiring, and the cook shook his head a lot, but not so admiringly. Now I wish I had seen what dad did, because the dish turned out basically like shreds of eggplant jerky. It was chewy, and crunchy in parts, and had a few places where the flesh of the eggplant hadn't been dried or seared out, but remained slightly tender and almost custardy. I asked day what it was seasoned with, and he said just salt, pepper. No soysauce? Just a little "for color" he said.

The dish I made today does not resemble the dry fried eggplant dad made, but eggplant always makes me think of that.


Wednesday, January 30, 2013

The Yarnlings


Most of these were made last year, but this week I made several changes to the formula which is the mini alien pattern found here. If  you click over to my flickr photostream, you can see individual pictures of all of them, I think they're quite appealing. I gave them all names according to their personalities.

This really is a very excellent pattern, and all but the last two I made followed it exactly. I knitted them in the round on size 2 double pointed needles for the most part. Peeve and Bigfoot are the only ones I made on different needles, Peeve was made of sock yarn and requires a set of size 1's, and Bigfoot was made with a rather different beginning that required a circular #3.

This is Six
Six was my first attempt to alter the construction. I followed the instructions for the circular cast-on exactly, up to the point where you make bobble arms. After the first set of bobbles are made, knit 4 rows plain, then repeat the bobble row, and finish as directed in the pattern.

After Six, the notion I  had of making an alien with more pronounced lower limbs took hold of me, and I made Bigfoot. Bigfoot requires a circular needle, because I used my favorite start-in-the-middle cast on, found in this handy video. 

Bigfoot.
To make your own bigfoot, cast on 20 stitches according to the video. That's 10 on the top needle, and 10 on the bottom. On round 1, start by making a bobble, knit 8, make a bobble, knit 10. Knit rounds 2-7 according to pattern. Knit an extra round, maybe two, depending on how squatty you want the body to be ( I think I knitted 2 extra, because I wanted him taller). Continue following instructions from round 8 to the end of the pattern. Run a long tail of yarn through the remaining 6 stitches, and stuff the alien through the hole on the top. Pull the yarn tight,tie off, and decorate as you like.

None of these guys is very big. Bigfoot and Six are only about 3 inches tall, and Peeve barely tops an inch. Maybe that's why he's so irritable.

Wednesday, January 23, 2013

Dubious


In honor of national pie day, I made a coconut pudding pie. It isn't as strange as the basil seed thing, but it's not what I thought it would be either. I was thinking of a sort of egg custard pie, but with a coconutty aspect to it. But I distrust egg custard pies; I have it in my head that they are difficult and finicky things. There's no reason for me to think this. I've never tried to make one. But I decided to go for a pudding pie recipe instead, where you cook the crust and the filling separately. Irrespective of my fear of egg custard pies, the big reason I chose the pudding route was that I bought a disappointing coconut substance at Fubonn the last time I went.

You can get several brands of powdered coconut milk there. I have no idea what you're supposed to do with it for, but I put it in coffee as creamer, I use it as a topping for oatmeal, and I make rice pudding with it. Out of curiosity I tried a new brand, and it turned out to be slightly loathsome for any of my usual purposes. Unlike my preferred brand, this one has a large percentage of starch added. It also has a bunch of salt. The starch makes clumps in my coffee, and tastes chalky in my oatmeal. The salt is gross for both applications, so I didn't even try a rice pudding. So, pie.

One 9" pie crust of your preferred type. I made a slightly sweet pastry crust. 

Should have read the ingredients.
1 pack of this coconut powder
2 eggs
2 cups water
1 tsp vanilla
1/3 cup sweetened condensed milk
a pinch of nutmeg
toasted coconut flakes for the top

Pre-bake the crust until it is slightly browned and then let it cool completely.

Put everything else except the coconut flakes in a blender for about a minute, then pour the mix into a small saucepan over medium heat. Using a whisk, stir constantly until the filling is as thick as jello pudding. Pour the filling into the crust and refrigerate for at least a couple hours, until it is quite chilled. Top with toasty coconut just before serving.

This is super easy, but there are a few things that are worth explaining.

1. For the first 8 minutes the filling is on the stove, absolutely nothing will happen. Then it will thicken rapidly.
2. So why stir for all that time? To prevent lumps. The bottom of the pan will be hot enough to cook the filling solid down there before the rest of it is done unless you keep stirring.
3. A moderately slow and lackadaisical stirring motion is sufficient until it starts to gel up. Then you want to stir fast and methodically or again, lumps.
4. The toasty flakes add crunch, which is important because otherwise this would really be boring.
5. Remember the salt complaint? That's what the sweetened condensed milk is for. The salt is still in there, but the sugar balances it out. Also improves the mouth feel.
6. What if you don't have a blender? Make sure you whip it to within an inch of its life or else, Lumps!

My pie research led me to believe that the starch in the coconut powder would lend itself to a pudding-style filling, and I was right. If you like coconut pudding pie, there is no reason to go looking for this particular off-brand of coconut powder either, you can just use 2 cups of coconut milk and 1/4 cup of cornstarch instead. Make sure you get the full-fat kind of coconut milk too, no sense in doing things by halves.

Well of course I had pie for breakfast. And a boogerty egg and coffee. That's what you do on Pie Day.

Wednesday, January 16, 2013

Shao Bing


The last time I went to Fubonn, I got some frozen things that said they were shao bing. They were ok, but they weren't much like the shao bing I remember. Naturally, I had to make a batch of my own.

Take a tablespoon of flour, a tablespoon of sesame paste, and 3 tablespoons of cooking oil and simmer them together in a little sauce pan until the flour doesn't taste raw any more. Set it aside.

Make a recipe of the ubiquitous dough. Let it relax for about 15 minutes, then divide it into 10 pieces. Roll each piece into a long skinny strip about 3 inches wide by 12 inches long. Spread a small amount of the oil mix over the whole piece of dough, then roll it up into a little log about 4 inches long and maybe 1 1/2 inches thick. Repeat with all the dough bits.

Cover them and let them rise for about half an hour, maybe a little longer. They won't be really poofed up, just relaxed enough that you can roll them out flat.

Now is a good time to pre-heat your oven to 475.

Start by laying your rolling pin along the long axis of the rolls. Smoosh them down firmly and flip them over once or twice before rolling them long ways once or twice or your shao bing will be way too long and skinny. Lay the shaobing on a cookie sheet and brush with egg wash, then sprinkle with sesame seeds. Bake for 10-15 minutes. They should be just slightly brown.

Notes:

1. Dough texture is very important. This dough should be quite soft, and it takes a lot of kneading to get the flour to absorb all the water and then smooth out. If you do this by hand, don't be tempted to add a bunch of flour to cut down on sticky. Just keep kneading, it'll eventually pull together. I can't over-emphasize the convenience of a machine that will knead things for you- I would never make yeasted anything otherwise.

2. Frying the flour in oil is also key. Frying causes the starches & proteins in the flour to respond differently to water. Spreading a layer of cooked flour over the dough creates regions of particles that prevent the raw dough from gluing itself together, resulting in a layered end product. Yes, oil alone will do that, but the flour allows you to treat it much more roughly.

3. I used cooking oil. Dad used some kind of animal fat. If you did that, it would probably be a lot less gross than when dad did it. There were always things in the drippings he used.

4. As always with yeast breads, the temperature and humidity of the room will affect the amount of time it takes to do this. If its cold and dry in your house, you will need to be patient, and cover your dough with a piece of oiled saran wrap. If you bake in the summer when its warm and humid, things will go very quickly.

These are undeniably best fresh out of the oven when they are crispy on the outside and chewy inside. The Chin Family Approved Method for cutting open shao bing is to grab your chinese Nana's cast iron scissors, check to see if there are any hair clippings, bits of paper or other fluff stuck in the hinge, ignore it if there is, then cut open the shao bing by poking the bottom blade in one end and snipping it open along the edge. A very sharp knife used like a letter opener works too. I don't remember what we used to put inside them when dad made them, probably ham and hoisin sauce. I like tuna, or roasted eggplant, or scrambled eggs and cheese. Butter and honey is mighty fine too, but it can be a bit drippy. I don't think dad salted the dough as heavily as I do either. He used to sprinkle salt mixed with crushed szechuan pepper in them I think. I like this better- the dough is evenly savory instead of having random streaks of bitingly salty bits. Maybe I'm thinking of duck rolls though. That's another story, and I might have to see if I can get Pete to try to fry a duck.


Sunday, January 13, 2013

Phuoc Hue!


Not much more needs to be said.

Saturday, January 5, 2013

Brussels Sprouts Again


Every time I eat brussels sprouts I wonder what happened to me that I now enjoy them so much. The first time I ate them was the last time for about 20 years. Mom got some once, and was very excited about them. She kept saying how she'd loved brussels sprouts, even when she was a little kid. I thought that was a positive sign. She cooked them in butter, and the buttery delicious smell did not prepare me for the sulfurous, bitter, mushy stringy reality of eating them. It was an early example of the many things which were to instil a profound philosophical skepticism in me. So, it's totally awesome and will knock my socks off and all like that, will it? Well, I'll believe it when I see it.

Twenty years later I was washing dishes for a living. One of the kitchen managers (they hadn't got all hoity toity and started calling them 'chefs' yet) decided to make some roasted squash and brussels sprouts. To my surprise, I thought, "hm, those really don't smell like ass the way I remembered". It took me about another year to realize that I actually liked brussels sprouts. I think I've written 3 or 4 posts about brussels sprouts now. Here is another thing to do with them.

1 pound or more brussels sprouts, trimmed and halved
handful of raw walnuts
handful of dried apricots
dab of butter
pinch of salt
1/2 tsp nutmeg
1/4 tsp smoked hot paprika
tiny pinch of allspice
1 tsp sugar

chevre, because everything is better with cheese.

Put a dab of butter in a frying pan and add the walnuts, salt, and sugar. Fry on medium-low until the nuts are golden and the sugar has begun to form dark brown crunch bits. Toss evenly with the spices and remove from heat. Slice the apricots into sticks and toss them into the pan with the nuts, and give them a stir to get a little of the spices on them.


Put the sprouts in a lidded casserole with a little butter and a sprinkle of water. Microwave 3 minutes at a time until they are bright green and just tender. Toss with the nuts and apricots, serve with a few cheese crumbles.

David asked me how I come up with food ideas. I hadn't thought about it much before, but in this case, it went something like this:

1. I like the aforementioned sprouts and squash.
2. But I was bored with it.
3. So I thought about what it is about squash that makes it tasty.
4. That would be the fact that roasted squash is a little nutty, a little sweet, and has a little bit of texture.
5. So, use nuts, duh. Toasted ones are best.
6. And something sweet, but not very sweet. And not too squishy. Apricots are that, plus they have a nice color.
7. Bacon makes everything taste great, but I didn't have a hankering for that much grease.
8. So I added smoked paprika, which has a bacony smell.
9. But no protein, which is one of the things that makes bacon so good.
10. So, cheese.

And there you have it. Brussels sprouts with walnuts, apricots, and goat cheese.

Wednesday, December 19, 2012

Steamed Chicken & Chestnuts


Pete & I made this once before, by which I mean, Pete made it while I had a beer or something. It was always one of my favorite dishes that Dad used to cook for his insane chinese Thanksgiving feasts, but of course he used turkey for that. I wish there was a way to make this a little more photogenic, but it really isn't a visually exciting food. Oh well. Makes up for it by being delicious. I think I got in trouble for eating all the chestnuts out of the dish when I was little. This is a small recipe, unlike the banquet-sized version Dad used to make.

1 cup sticky rice, like sushi rice or thai sweet rice. Arborio rice for risotto would probably work too.

1 lb boneless chicken
3 T white wine if you have it, or a small splash of rice or cider vinegar
1 tsp minced fresh ginger
1 T sesame oil
4 T light soy sauce
a dash of pepper
a little salt

12 fresh chestnuts

If the chicken is fresh, cut it into 1-2" pieces, and mix with the marinade ingredients. Let it sit for a good half hour.

If your chicken is frozen, put it in a covered container with all the marinade ingredients in the fridge until it thaws out. Stir it from time to time, it may take several days. Then cut it into bits. In either case, save the marinade.

Meanwhile, in a dry skillet over medium heat, toast the rice until it is opaque and slightly golden. Keep the pan moving or the rice will cook unevenly. Let it cool enough to handle, then grind it into a coarse powder. A little coffee mill is good for this, but a small food processor works pretty well too. Set the rice powder aside.

Use a very sharp knife to score a hole in each chestnut, then boil them for about 10 minutes. Peel off the tough shell, and the inner skin. It's ok to break the nuts into a couple pieces. Roll each chicken nugget in the crushed rice, then arrange the chestnuts and chicken pieces in a bowl so that they're evenly distributed. Drizzle the reserved marinade over them. Cover the bowl with tinfoil, poke several holes in the foil, and steam the whole business for about an hour, or until the meat reaches 175 degrees.

Notes:

1. Thighs are very good for this. They take a little more goofing around with than breasts or tenders, but they have much more flavor. Just be sure to trim the excess fat and tendon off, or it will be gristly.
2. If you want to turn the dish out of its cooking bowl in an attempt to make it look fancy, remember to oil the bowl well before filling it. I forgot to do that, and had to squish it back together for the picture.
3. Do use a meat thermometer. I have no idea how Dad knew when this stuff was done back then. I think he probably just cooked the hell out of it and assumed it was ok. 175 is actually hotter than it needs to just be cooked, but you have to leave it in somewhat longer than that for the texture to come out right.
4. Don't be tempted to leave the inner skins on the chestnuts. They have a texture like wet brown paper bags, and are amazingly bitter. If your nuts don't skin easily, make sure they are scored all the way through the shell, and boil them for another minute. Leave them in the hot water and fish them out one at a time as you peel them. The moisture encourages the skins to come off.
5. I forgot that I own a steamer. However, that means that you don't need one either. I got a large pot, put about 2 inches of water in the bottom, dropped in a little bowl, put the chicken dish on top of that, then put the lid on the pot. Simple.

Chestnuts are a weird thing- they are slightly mealy because of their high starch content, and for the same reason, they are slightly sweet once cooked. They have a subtle, floral aroma, and have an almost meaty taste which must explain why they go so well in meat dishes, especially with poultry. Chicken and turkey compliment the nuts without overpowering their unique flavor. Aside from the chestnuts, the other thing that makes this dish interesting is the toasted rice powder. If you were to dredge the chicken in plain flour, or even untoasted crushed rice, the texture would just be gloppy. Toasting the rice gives it a firm but tender mouth feel. The principle is the same as for making risotto, which is why I am assuming arborio rice would work fine for this.


Man I still love this stuff.


Sunday, December 2, 2012

Wait, what did you say?


When I said I wanted to make one of these, David thought I said I was going to bake a Stalin. So I laughed at him and said yeah, I'm gonna bake a tiny gingerbread dictator. "Five Year Plan", David says, in a silly Russian accent.

I thought it was funny.

Stollen is not bread, it's a yeast-risen cake. It tends to be quite dense, and it has candied fruit in it. I think it is related to panettone, which is another thing I may try to make someday. Right after the lefse.

For the dough:

2 1/2 tsp yeast
2/3 c warm milk
1 egg
1/3 cup sugar
1/2 tsp salt
1/3 cup butter
3 cups bread flour
1/4 tsp cinnamon
1/4 tsp nutmeg
pinch of allspice
2 cups mixed dried or candied fruit, cut into little bits

You may also want:

6 oz marzipan

1 oz brandy or rum
1 T butter
lots of powdered sugar

You can proof the yeast in the milk, if you want, but I use instant yeast so I don't bother. I put all the ingredients for the dough except the dried fruit in my bread machine for 20 minutes. After 15 minutes, I put in the dried fruit so it didn't get ground to paste by the beaters.

If you don't use a bread machine, you can do the mixing by hand, just be aware that the dough is extremely sticky. Unlike normal bread dough, this will not form a neat, easily handled ball. It will have a texture more like Jiff peanut butter, but springier.

Let the dough sit until it has doubled in size. Once the dough has risen, gently deflate it a bit then flatten it out on a well oiled cookie sheet. Squish the marzipan into a shape that fits well on slightly less than half the dough, then fold the dough over and pinch it closed around the marzipan. Let it rise until it has nearly doubled in size, then pre-heat the oven to 375. Bake the stollen at 375 for 15 minutes, then turn the heat down to 300. Bake for another 30-40 minutes.

Remove the stollen from the oven, and pierce the crust thoroughly with a fork or other sharp pokey thing. Put the brandy and butter in a small container and microwave just long enough to melt the butter. Stir or shake to emuslify the mix, then brush over the stollen. Generously coat the loaf with powdered sugar, then cover loosely until cool.

Notes:

1. I used a combination of candied orange peel, dried cranberries, raisins, and dates in mine. Some people use chopped nuts, too, and some recipes call for mace or cardamom. Feel free to flavor it the way you like it, it's your cake!
2. There is no reason you have to put marzipan in it, or cover it with brandy and sugar. But I can't imagine why you wouldn't want to. (Some people prefer to make a drizzle of icing out of confectioner's sugar, which does make it less messy.) If you do go for powdered sugar and hooch, be very generous with the sugar. Most of it will tamp down into the steam from the warm cake.
3. The loaf will not get very brown. Don't worry, it's not supposed to. Stollen should be moist, not crunchy.
4. It takes a very long time for this dough to rise. The high concentrations of fat and sugar in it inhibit the action of the yeast, so you do need to be patient. This recipe took me nearly 6 hours to make.
5. Ohmigod this is insanely delicious.

Do you remember the first time you ever encountered fruitcake? That rather horrid, soggy, mortar-like confection that never gets eaten but always turns up at christmas?  Wasn't that a great disappointment?  It always had those shiny red and green bits of candied fruit, and smelled alluringly boozy, and tasted like car exhaust and rubbing alcohol. I kept trying to eat it for years, hoping that one day, I would find a fruitcake that tasted as good as it looked.

My search has ended. This cake is tender and rich, delicately sweet, meltingly chewy. There is just enough fruit to make each bite a little different from the last. It has an alluringly boozy aroma all right, cuz dammnit, I put actual booze on my fruitcake. The coating of sugar compacts into a thin, ever so slightly crunchy crust that dissolves almost instantly in your mouth. Glucose euphoria.


Not a Real Pizza


It's round, made of dough, and has cheese melted on it to glue down the other toppings. But I think that this is still not a real pizza, which must have tomato sauce on it. And mozzarella cheese. Everything else is negotiable. But this still looks pretty appealing. I found the recipe in the paper, and it does have many of my favorite things: blue cheese, nuts, fruit. Bread.

8 oz crumbled blue cheese
a dash of cream*
1 apple
walnuts
a handful of arugula
pinch of minced fresh rosemary
salt & pepper

half a recipe of pizza dough

Pre-heat the oven as hot as it will get without being on broil.

Smash most of the cheese with the cream until you have a thick lumpy sauce. Keep a few crumbs for the top of the pie. Stretch out the dough and spread the sauce on it, slice the apple and arrange a layer over the sauce. Throw on a handful of arugula, the nuts, the rosemary, and the remaining bits of blue cheese. Dash on a tiny bit of salt, and a good amount of pepper. Bake for about 15 minutes.

Notes:

1. *I didn't have cream, so I mixed a couple tablespoons of dry milk with about 3 tablespoons of water. It was just fine. You could use actual milk too, I guess.
2. The picture shows that I constructed my pie backwards, i.e. with the apples on top of the arugula. It was ok, but I like it when the leaves get crispy and slightly black around the edges, so I would rather have put them on the top.
3. My walnuts were raw and frozen when they went in the oven, which probably helped to keep them from burning up. Burnt arugula is ok with me, burnt nuts are not.
4. The original recipe did not call for arugula, but I think it adds something. The original also called for pre-cooking the crust a bit, which appears unnecessary and fiddly.

It may not be real pizza, but it is real tasty. The apple juices cook out and mix with the cheese to make a sweet-salty topping, the nuts are crunchy and buttery, the rosemary adds a little sharpness to balance the richness of the cheese. It's pretty good for lunch the next day, but straight out of the oven, when it's still hot, crunchy, and chewy, it is amazing.